

Learn techniques for making simple cord bracelets that you can stack and mix and match for fun DIY style!
With just cord, beads and other fun items like chain and charms, you can make a cool set of stacked bracelets that you can wear all together or mix and match to suit your mood. Use these techniques to make a set of your own, or follow our instructions to make the sets we have designed: Rose Gold Stacked Bracelets, Cactus Stacked Bracelets, Save the Turtles Stacked Bracelets, Celestial Stacked Bracelets, Honey Bee Stacked Bracelets, and Sweet Love Stacked Bracelets. No tools are required to make these bracelets, but we do suggest some helpful extras: Super glue or other adhesive (try clear nail polish!) to glue your knots and keep them secure. This is especially important if you plan on wearing these bracelets all the time. Glue is good for smaller, single knots. Loctite Super Glue Ultra Gel Control is ideal because the squeezable sides make it easy to control the amount of super glue you apply to each knot. A thread burner is an alternative to glue. You can use this tool to melt and secure knots (only use thread burners on synthetic cords – natural fibers will burn!). This is good for the sliding knot closures and knots made with multiple strings. We recommend the Perfect End Thread Burner, but you can use a lighter if you're careful.
Cut one cord approximately 4 feet long and fold in half. Cut another cord 20 inches long and place it over the fold of the longer cord, leaving an 8-inch tail at the top of the 20-inch cord. You can also use two cords in the center. The ends of both cords should now be parallel to one another.
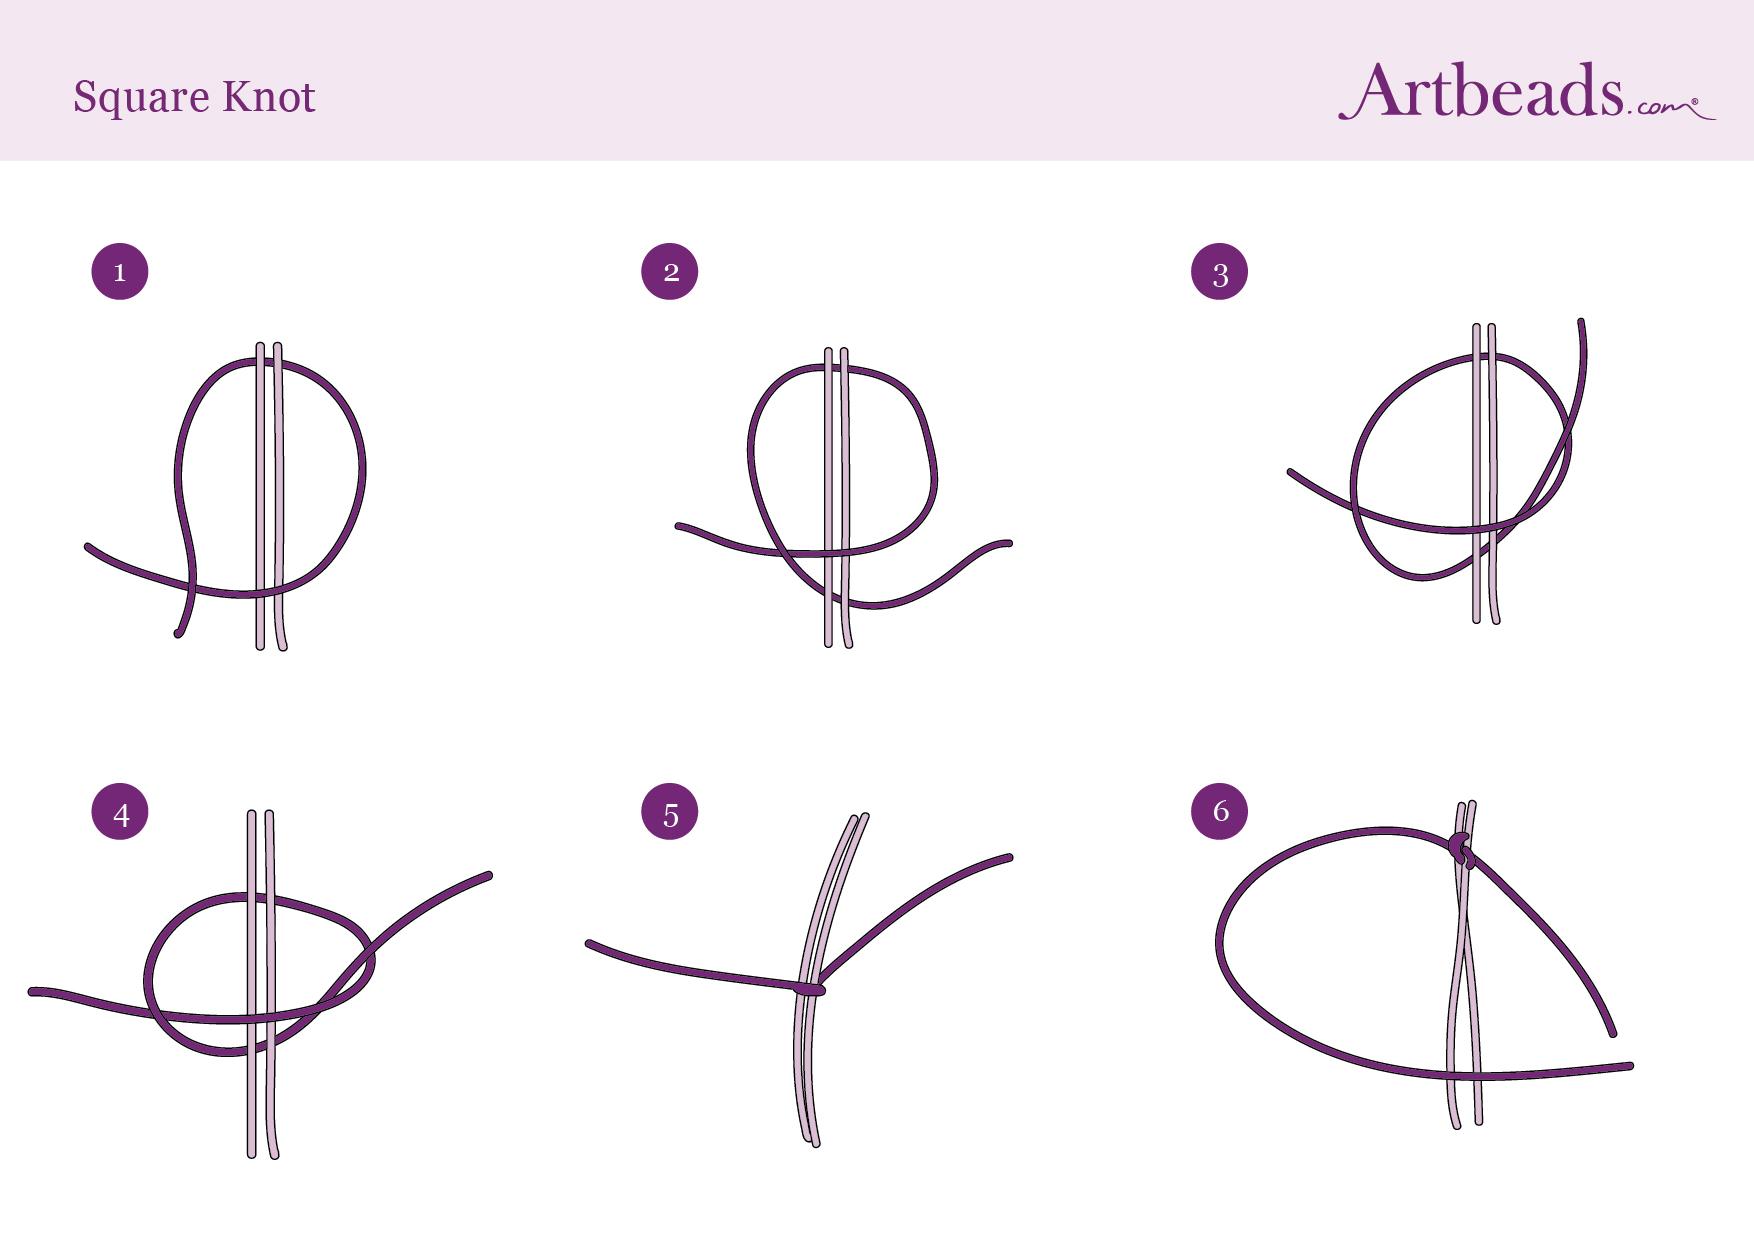
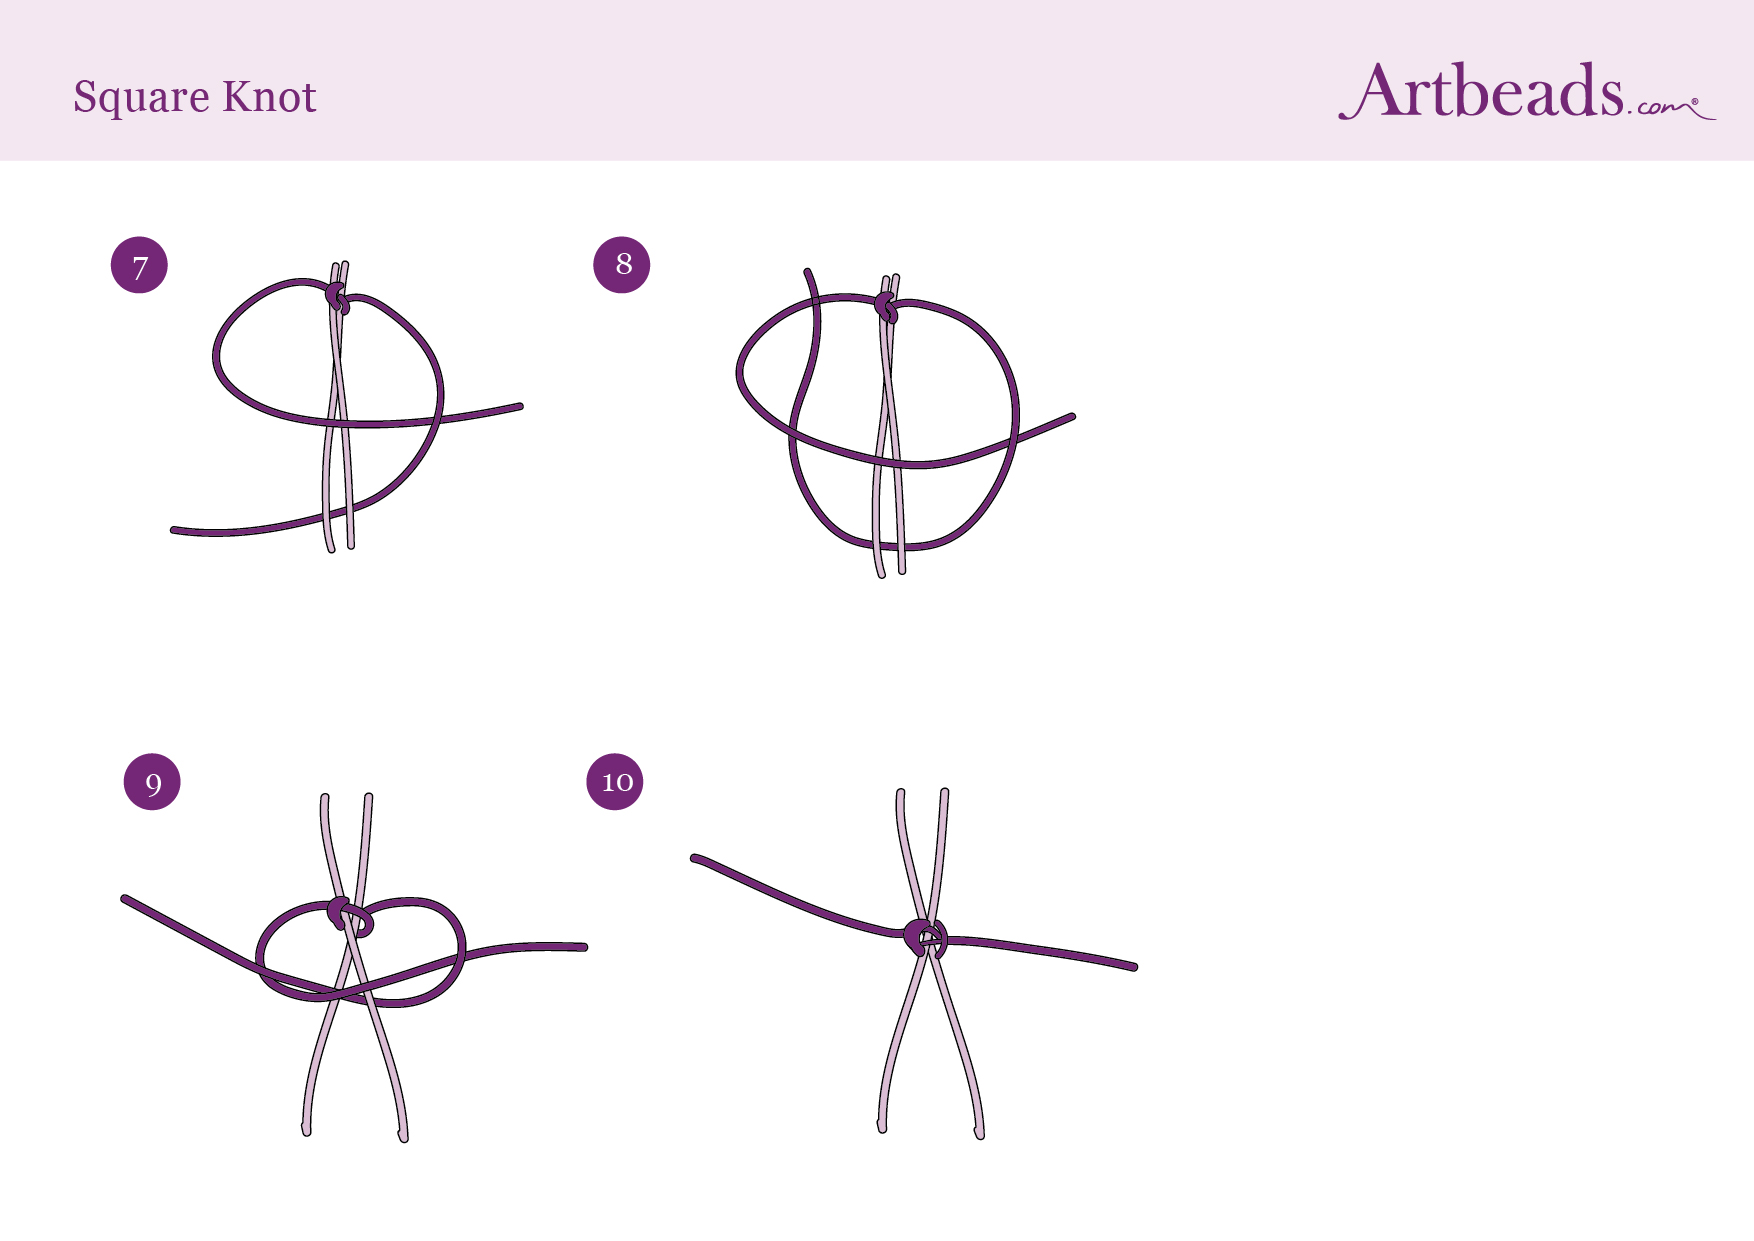
Move the right side of the cord over the center cord. Take the left side of the cord over the tail of the right side. Then, take it under both the right side tail and the center. Go up through the loop created by the right side. Pull tight.

Now go the opposite direction with your knots. Move the left side of the cord over the center. Take the right side of the cord over the left side tail and then under the left side and center. Go up through the loop and over the left side. Pull tight.
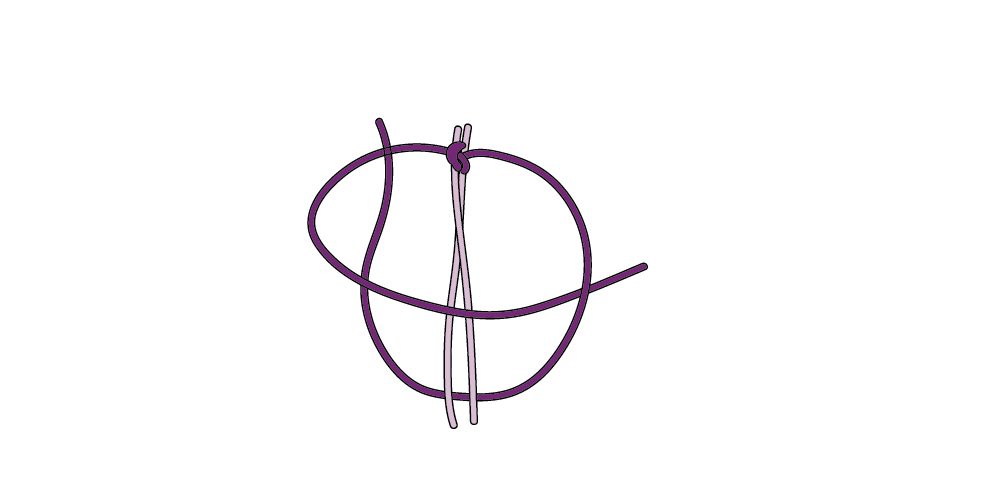
Repeat steps 2 and 3, alternating left and right sides. If you forget what side you're supposed to be starting with, look at the knots you've already made. The cord coming out from under a knot is where you start.
Adding a bead to the knot: To add a bead, slide your chosen bead up the center strand, close to the knots you've already made, and make the next knot around the bead. Pull tight. Make a plain knot after the bead to keep it tight. From here, you can add another bead or more plain knots. It's up to you!
Continue making knots for the desired length. Remember, you want enough cord length on each end of the knots to make a sliding knot closure for your bracelet. Then, knot the two long ends together around the center cord, to the back of the bracelet. If you are trimming any excess cords, make sure to add glue or use a thread burner on the knot for a secure finish to the trimmed pieces. Repeat at the start of the knots. Here is a full diagram of how to do the square knot for you to print out and keep handy:
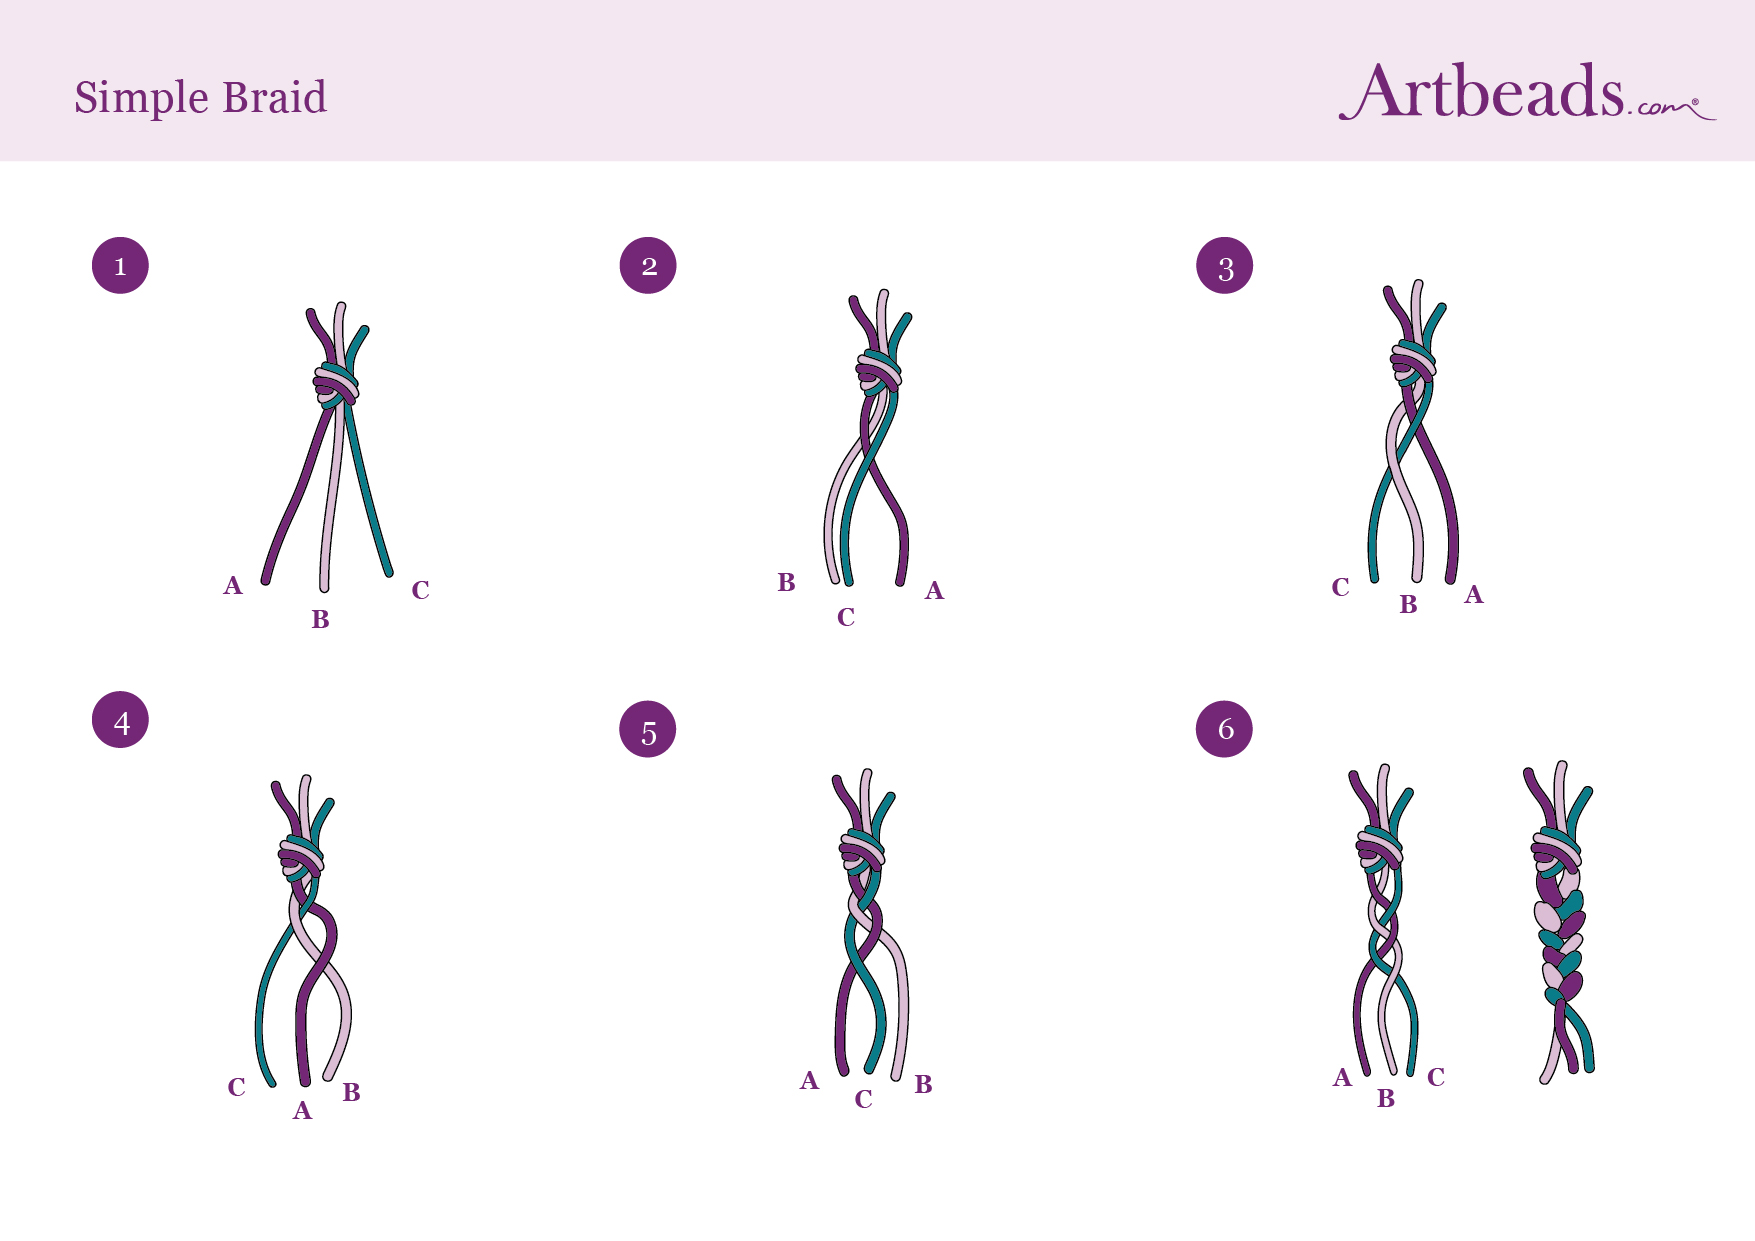
Cut three cords approximately 20 inches long each. Knot the three cords together, leaving an 8-inch tail.
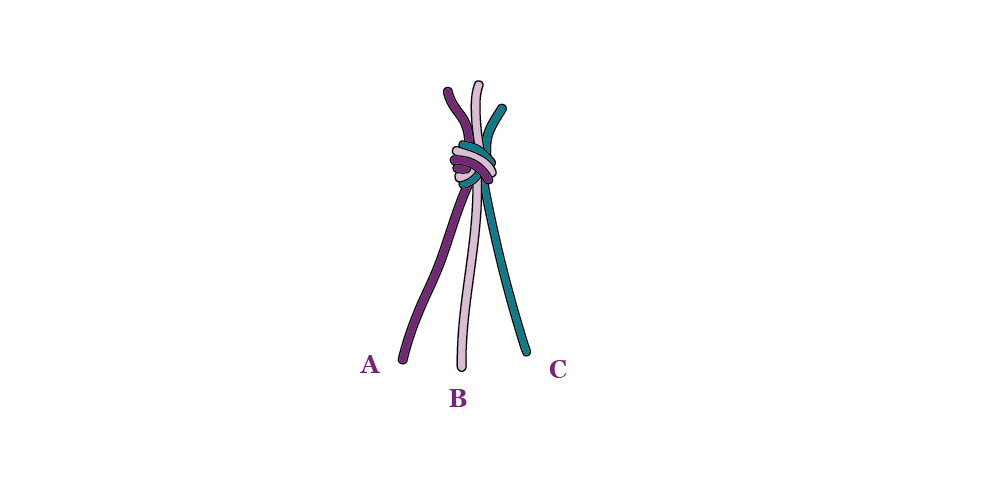
To start the braid, bring the cord on the right side (cord C) over the cord in the middle (cord B).
Bring the cord on the left side (cord A) over the new cord now in the middle (cord C).

Continue braiding, alternating bringing right and left sides of the cord over the center. When the braid is the desired length, knot the cords together. Remember, you want enough cord length on each end of the braid to make a sliding knot closure for your bracelet. Here is a full diagram of how to do a simple braid for you to print out and keep handy:
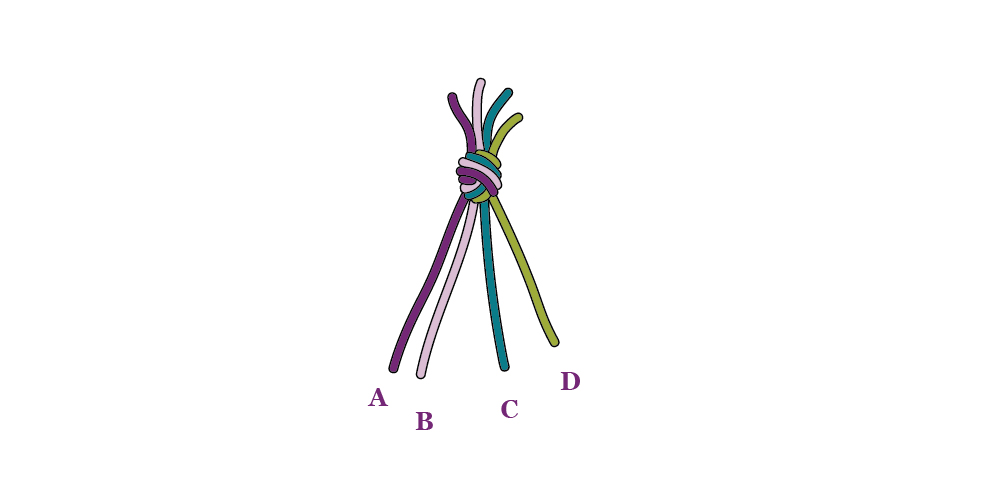
Cut four strands of cord each 2-feet long each. Tie the cords together in a knot, leaving an 8-inch tail.
Tape the cords to your work surface, taping above the knot, and separate the four cords out, as shown in the diagram.
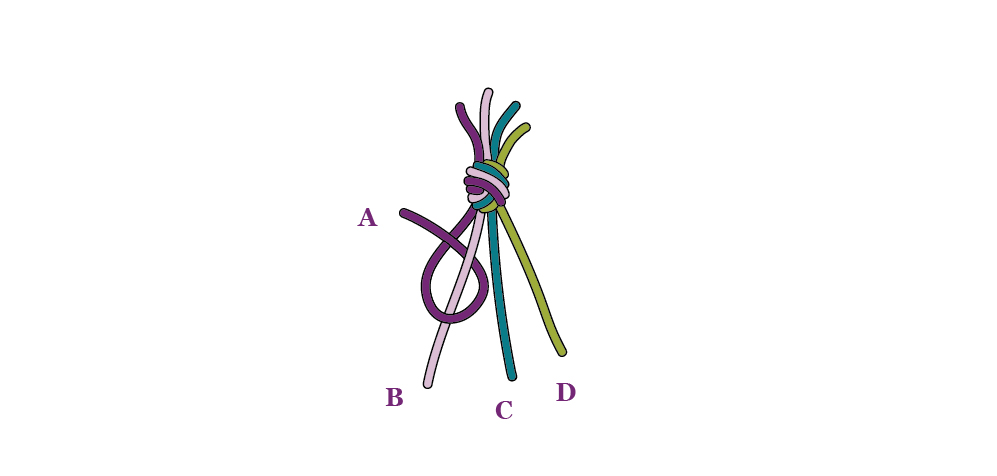
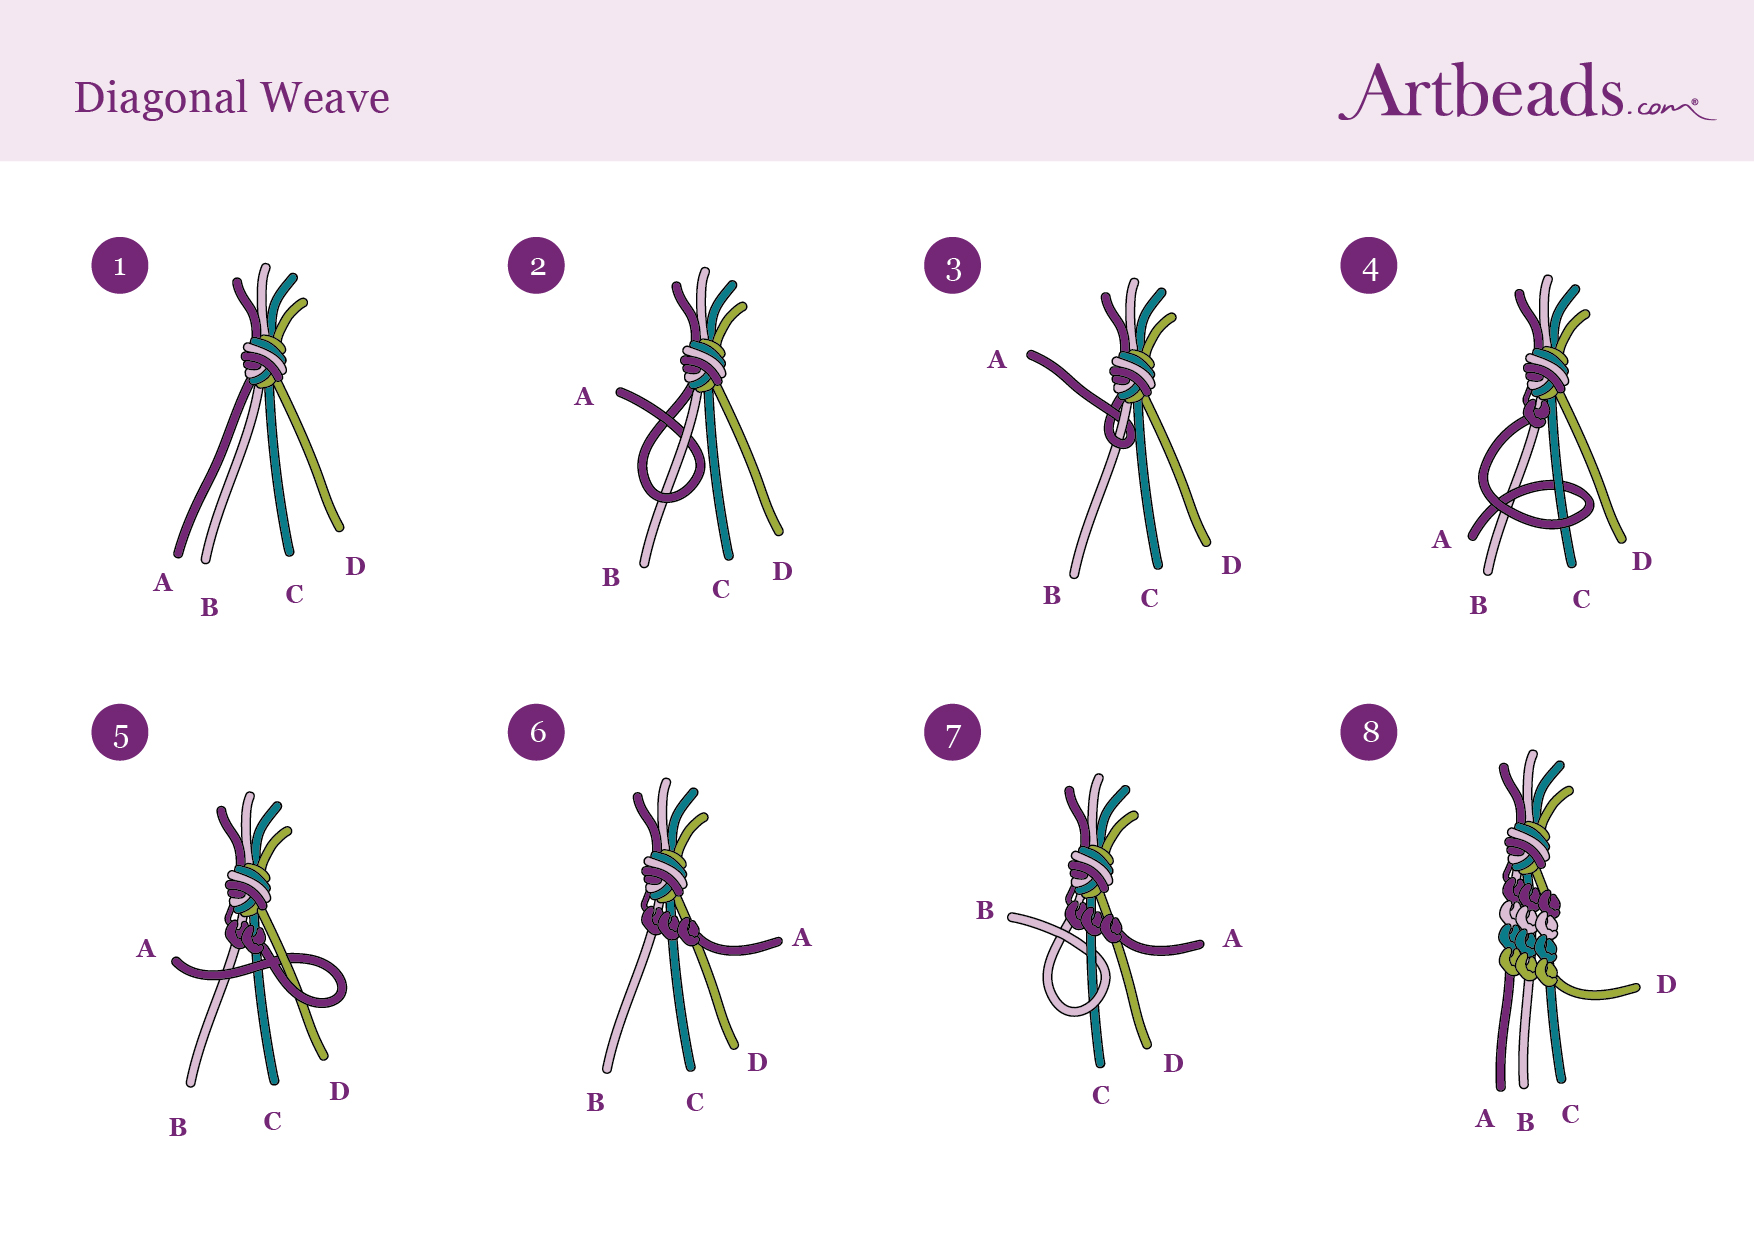
Start with your far left cord (cord A) and loop it over and then under cord B. Bring it up through the loop created and pull tight to make a knot. Repeat to make a second knot on the same cord. Make sure to hold cord B tight as you pull on cord A.
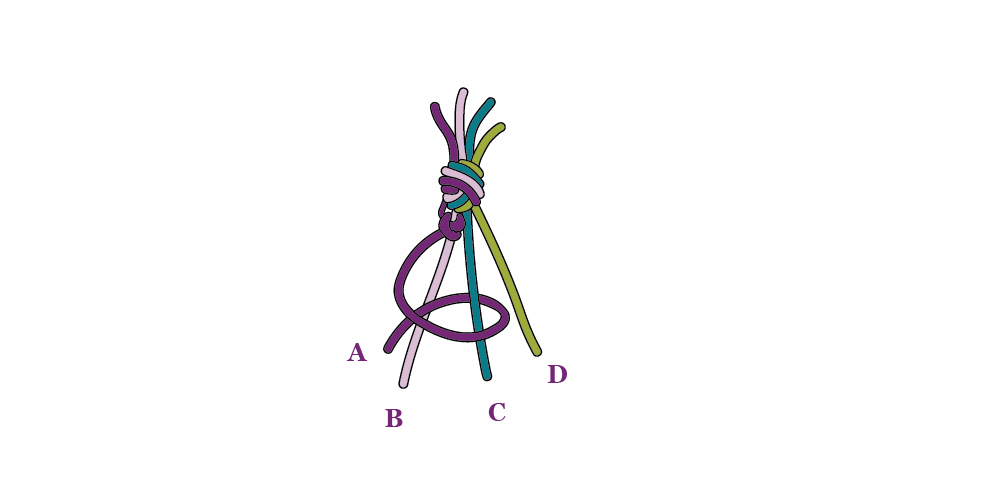
Use cord A to make a knot around cord C in the same manner as before. Remember to repeat the knot on the same cord.
Use cord A to make a knot around cord D, as you did before. This will form a diagonal row of color across the cords.

Now you will repeat steps 3-5 using cord B as the color for this next diagonal row, as it is now the color on the far left.
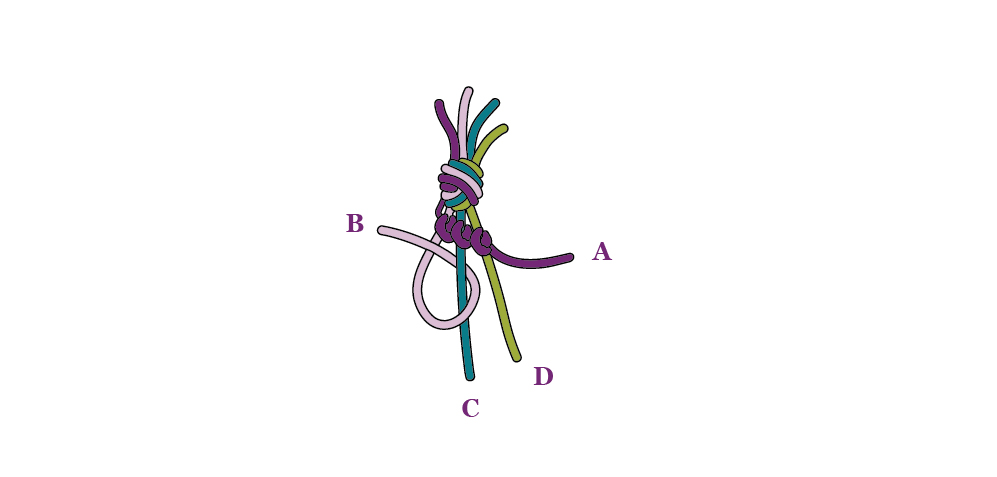
Continue knotting in this manner for the desired length, always starting each diagonal row with the cord on the far left.
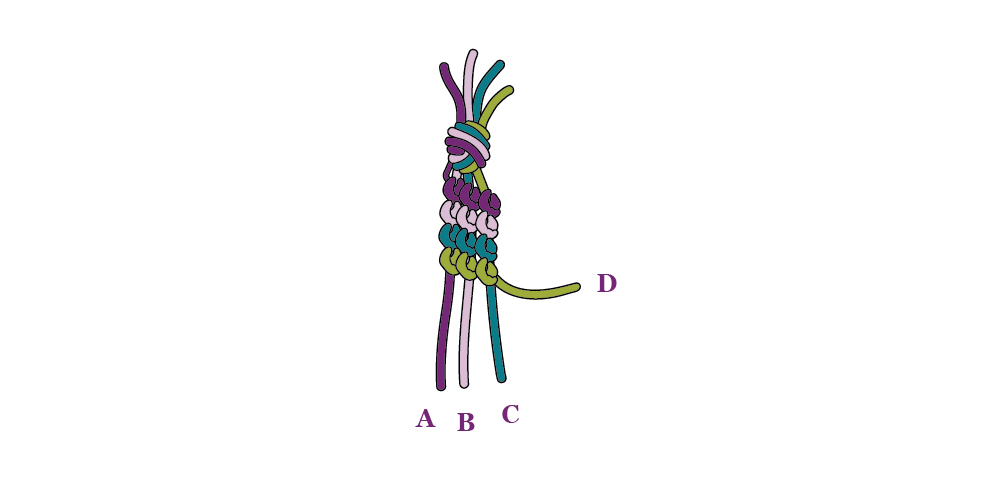
Remember, you want enough cord length on each end of the weave to make a sliding knot closure for your bracelet. Once the weave is the desired length, gather all four cords together and make a knot to secure. If you are trimming any excess cords, make sure to add glue or use a thread burner on the knot for a secure finish to the trimmed pieces. Here is a full diagram of how to do the diagonal weave for you to print out and keep handy:
This weave is similar to Diagonal Weave and we will use some of the steps in those instructions for this tutorial. Cut four cords that are 4x the desired bracelet length each. So if you want a 7-inch bracelet, each cord should be about 28 inches long. Fold the cords in half so that you have 8 ends to work with. Knot all of the cords together 8 inches away from the folded end.
Tape the cords to your work space, taping above the knot. Separate the cords and position them so that the colors mirror each other (if you're using different colors).
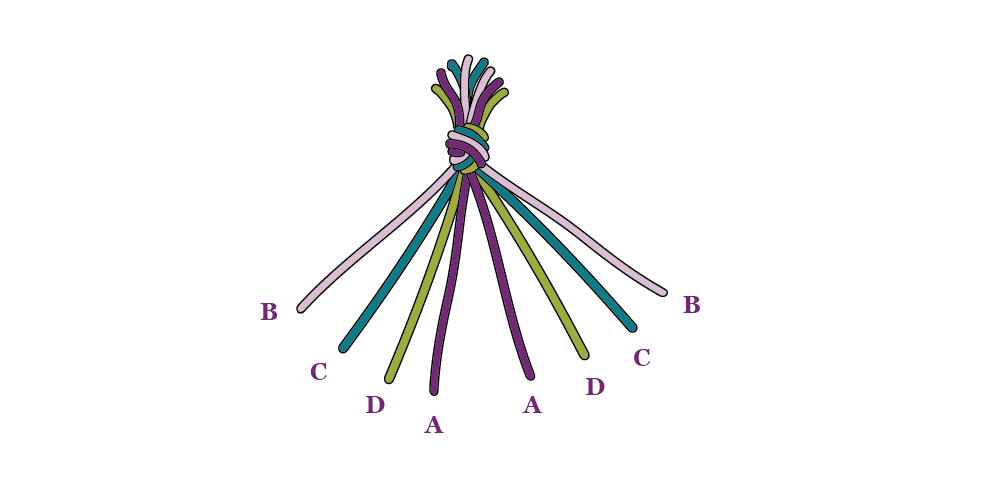
Refer to steps 3-5 for the Diagonal Weave to make the first half of the chevron in your weave.
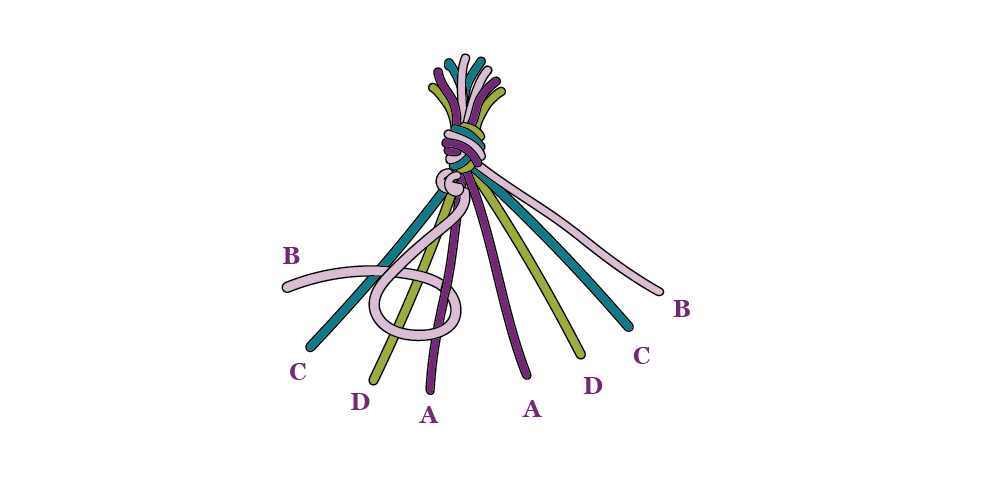
Now you will repeat the Diagonal Weave steps from the far right side, working toward the center, making the loops for the knots in reverse. Make knots in this manner with cord B around cords C, D, and then A on the right side.
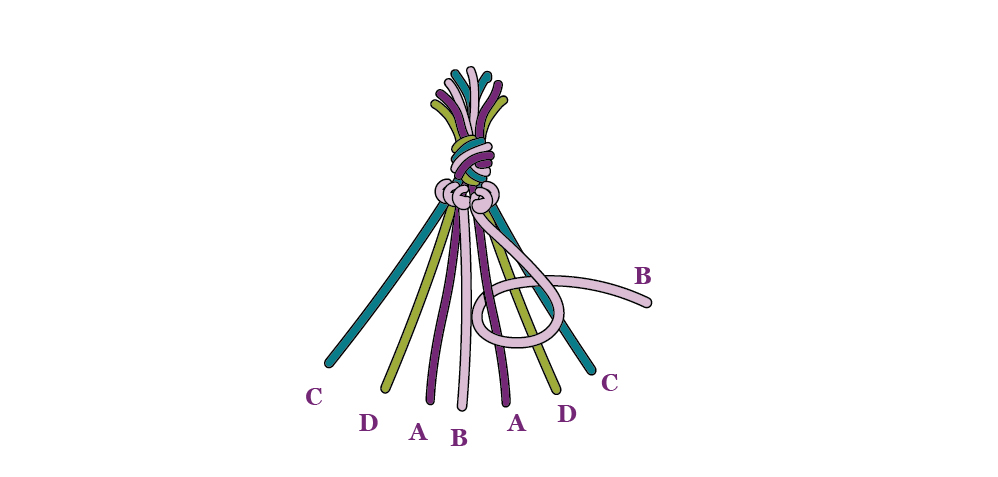
Your two B cords will now be in the center. Knot the B cords together in either a left or right overhand knot. Be sure to knot the center cords in the same fashion throughout the weave.
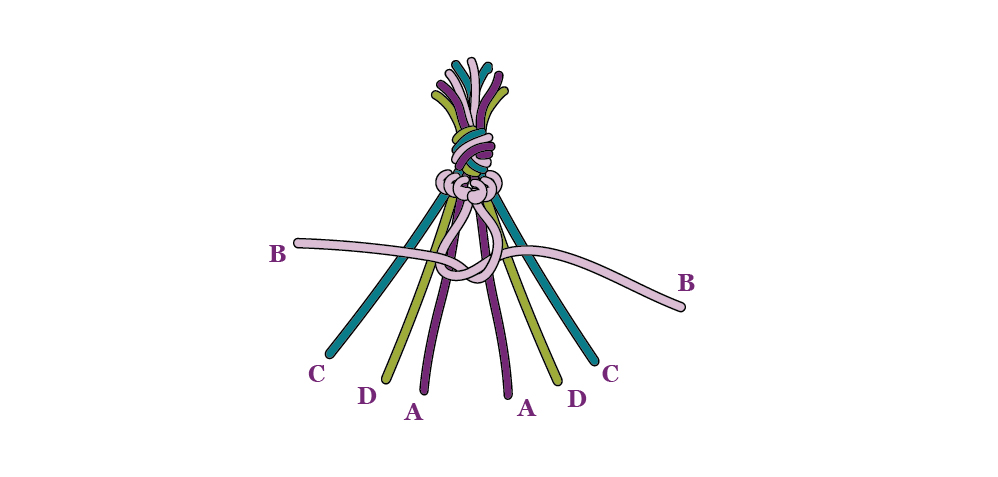
Your C cords are now the outer cords. Repeat steps 3-5, starting with the new outer cords and always working toward the center.
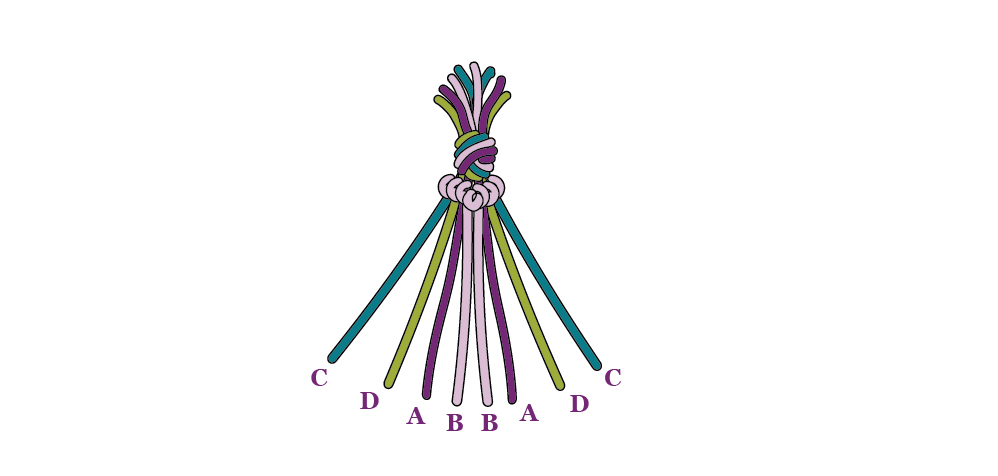
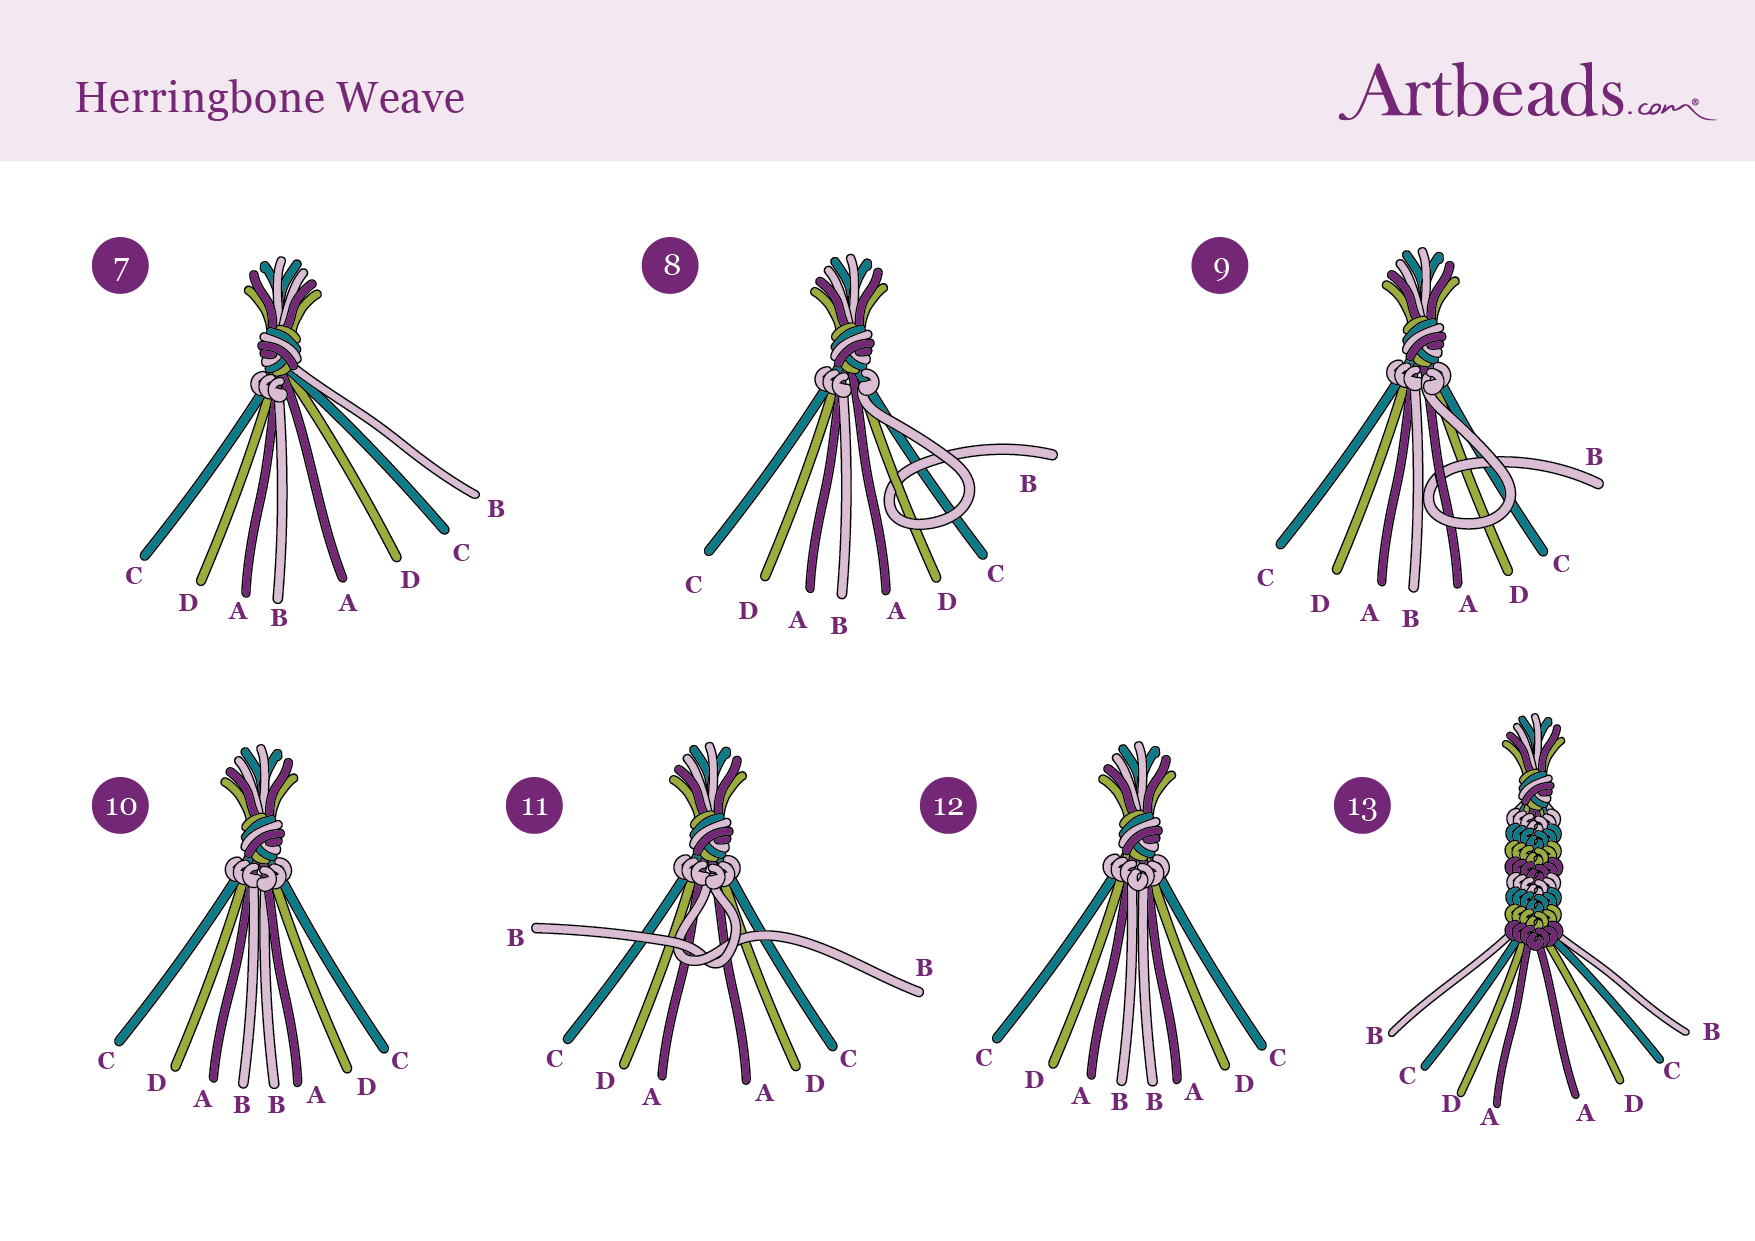
Continue this weave for the desired length. Remember, you want enough cord length on each end of the weave to make a sliding knot closure for your bracelet. Once the weave is the desired length, gather all four cords together and make a knot to secure. If you are trimming any excess cords, make sure to add glue or use a thread burner on the knot for a secure finish to the trimmed pieces. Here is a full diagram of the herringbone weave for you to print out and keep handy:

Before cutting the ends of your bracelet, fold the ends over each other, with each end facing in the opposite direction. Then, test the bracelet on your wrist. You want the bracelet to be able to slide over your hand, so you will need to knot the ends of the bracelet at the widest point to fit over your hand.
Cut a length of cord approximately 16 inches long.
Fold a 3-inch tail in one side of the cord and line this loop up with the ends of your bracelet, which should be coming toward each other in opposite directions.
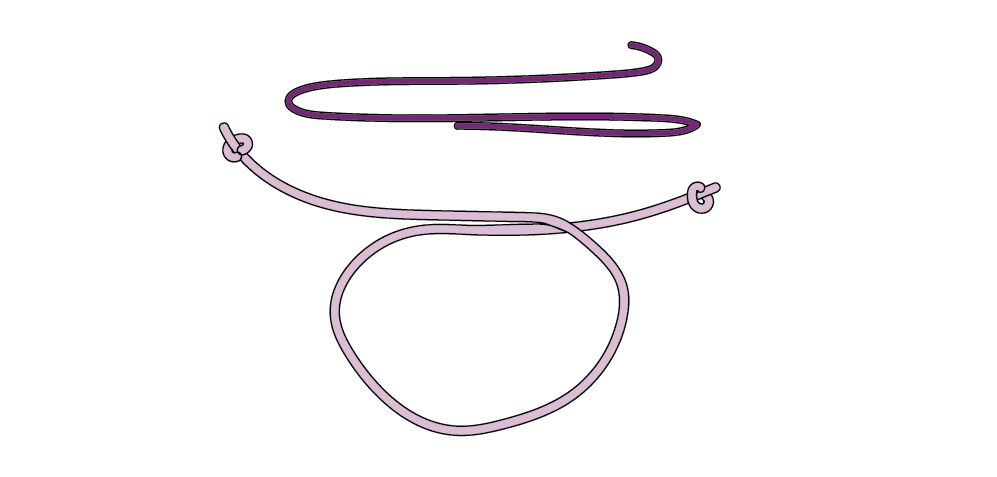
Pinch all of the cords together with your fingers. Then, loop the long end of the closure cord under your bracelet ends and back over them and the fold of the closure cord.
Loop the long end of the closure cord around in this manner 5-6 times.
Bring the end of your closure cord through the loops you made. Make sure the cord goes through all of the loops and you're not skipping over any.
The ends of the cord should be coming out from each side of the loops. Pull each one tight in opposite directions to make the sliding knot. You may have to adjust the loops with your fingers as you pull to get them to line up nice and tight.
From here, you can knot the ends of the cord close to the sliding closure, trim, and secure with either glue or a thread burner. Or, you can leave the cords a little long and add knots and/or beads to the end.
Nice choice! All or most of the products needed for this project are shown below with quantities. Sometimes we sell out of components and aren’t able to order more from the manufacturer (we know, it is very disappointing to us, too). Use the opportunity to mix up the design and make it yours by substituting similar products or altering the entire color scheme—it’s up to you!


Learn techniques for making simple cord bracelets that you can stack and mix and match for fun DIY style!
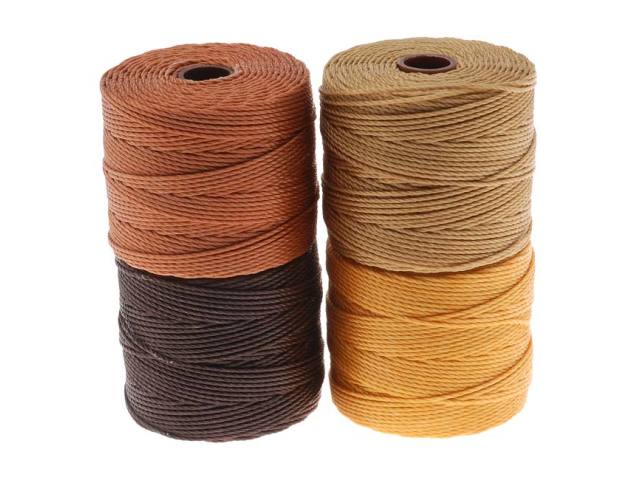


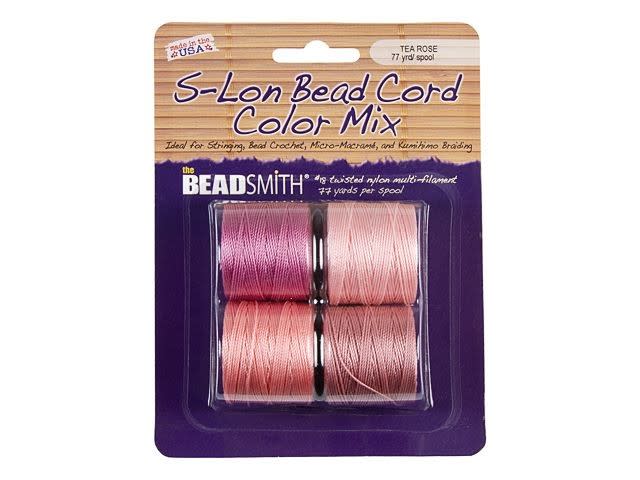

With just cord, beads and other fun items like chain and charms, you can make a cool set of stacked bracelets that you can wear all together or mix and match to suit your mood. Use these techniques to make a set of your own, or follow our instructions to make the sets we have designed: Rose Gold Stacked Bracelets, Cactus Stacked Bracelets, Save the Turtles Stacked Bracelets, Celestial Stacked Bracelets, Honey Bee Stacked Bracelets, and Sweet Love Stacked Bracelets. No tools are required to make these bracelets, but we do suggest some helpful extras: Super glue or other adhesive (try clear nail polish!) to glue your knots and keep them secure. This is especially important if you plan on wearing these bracelets all the time. Glue is good for smaller, single knots. Loctite Super Glue Ultra Gel Control is ideal because the squeezable sides make it easy to control the amount of super glue you apply to each knot. A thread burner is an alternative to glue. You can use this tool to melt and secure knots (only use thread burners on synthetic cords – natural fibers will burn!). This is good for the sliding knot closures and knots made with multiple strings. We recommend the Perfect End Thread Burner, but you can use a lighter if you're careful.
Cut one cord approximately 4 feet long and fold in half. Cut another cord 20 inches long and place it over the fold of the longer cord, leaving an 8-inch tail at the top of the 20-inch cord. You can also use two cords in the center. The ends of both cords should now be parallel to one another.
Move the right side of the cord over the center cord. Take the left side of the cord over the tail of the right side. Then, take it under both the right side tail and the center. Go up through the loop created by the right side. Pull tight.

Now go the opposite direction with your knots. Move the left side of the cord over the center. Take the right side of the cord over the left side tail and then under the left side and center. Go up through the loop and over the left side. Pull tight.

Repeat steps 2 and 3, alternating left and right sides. If you forget what side you're supposed to be starting with, look at the knots you've already made. The cord coming out from under a knot is where you start.
Adding a bead to the knot: To add a bead, slide your chosen bead up the center strand, close to the knots you've already made, and make the next knot around the bead. Pull tight. Make a plain knot after the bead to keep it tight. From here, you can add another bead or more plain knots. It's up to you!
Continue making knots for the desired length. Remember, you want enough cord length on each end of the knots to make a sliding knot closure for your bracelet. Then, knot the two long ends together around the center cord, to the back of the bracelet. If you are trimming any excess cords, make sure to add glue or use a thread burner on the knot for a secure finish to the trimmed pieces. Repeat at the start of the knots. Here is a full diagram of how to do the square knot for you to print out and keep handy:


Cut three cords approximately 20 inches long each. Knot the three cords together, leaving an 8-inch tail.

To start the braid, bring the cord on the right side (cord C) over the cord in the middle (cord B).
Bring the cord on the left side (cord A) over the new cord now in the middle (cord C).

Continue braiding, alternating bringing right and left sides of the cord over the center. When the braid is the desired length, knot the cords together. Remember, you want enough cord length on each end of the braid to make a sliding knot closure for your bracelet. Here is a full diagram of how to do a simple braid for you to print out and keep handy:

Cut four strands of cord each 2-feet long each. Tie the cords together in a knot, leaving an 8-inch tail.
Tape the cords to your work surface, taping above the knot, and separate the four cords out, as shown in the diagram.

Start with your far left cord (cord A) and loop it over and then under cord B. Bring it up through the loop created and pull tight to make a knot. Repeat to make a second knot on the same cord. Make sure to hold cord B tight as you pull on cord A.

Use cord A to make a knot around cord C in the same manner as before. Remember to repeat the knot on the same cord.

Use cord A to make a knot around cord D, as you did before. This will form a diagonal row of color across the cords.

Now you will repeat steps 3-5 using cord B as the color for this next diagonal row, as it is now the color on the far left.

Continue knotting in this manner for the desired length, always starting each diagonal row with the cord on the far left.

Remember, you want enough cord length on each end of the weave to make a sliding knot closure for your bracelet. Once the weave is the desired length, gather all four cords together and make a knot to secure. If you are trimming any excess cords, make sure to add glue or use a thread burner on the knot for a secure finish to the trimmed pieces. Here is a full diagram of how to do the diagonal weave for you to print out and keep handy:

This weave is similar to Diagonal Weave and we will use some of the steps in those instructions for this tutorial. Cut four cords that are 4x the desired bracelet length each. So if you want a 7-inch bracelet, each cord should be about 28 inches long. Fold the cords in half so that you have 8 ends to work with. Knot all of the cords together 8 inches away from the folded end.
Tape the cords to your work space, taping above the knot. Separate the cords and position them so that the colors mirror each other (if you're using different colors).

Refer to steps 3-5 for the Diagonal Weave to make the first half of the chevron in your weave.

Now you will repeat the Diagonal Weave steps from the far right side, working toward the center, making the loops for the knots in reverse. Make knots in this manner with cord B around cords C, D, and then A on the right side.

Your two B cords will now be in the center. Knot the B cords together in either a left or right overhand knot. Be sure to knot the center cords in the same fashion throughout the weave.

Your C cords are now the outer cords. Repeat steps 3-5, starting with the new outer cords and always working toward the center.

Continue this weave for the desired length. Remember, you want enough cord length on each end of the weave to make a sliding knot closure for your bracelet. Once the weave is the desired length, gather all four cords together and make a knot to secure. If you are trimming any excess cords, make sure to add glue or use a thread burner on the knot for a secure finish to the trimmed pieces. Here is a full diagram of the herringbone weave for you to print out and keep handy:


Before cutting the ends of your bracelet, fold the ends over each other, with each end facing in the opposite direction. Then, test the bracelet on your wrist. You want the bracelet to be able to slide over your hand, so you will need to knot the ends of the bracelet at the widest point to fit over your hand.
Cut a length of cord approximately 16 inches long.
Fold a 3-inch tail in one side of the cord and line this loop up with the ends of your bracelet, which should be coming toward each other in opposite directions.

Pinch all of the cords together with your fingers. Then, loop the long end of the closure cord under your bracelet ends and back over them and the fold of the closure cord.
Loop the long end of the closure cord around in this manner 5-6 times.
Bring the end of your closure cord through the loops you made. Make sure the cord goes through all of the loops and you're not skipping over any.
The ends of the cord should be coming out from each side of the loops. Pull each one tight in opposite directions to make the sliding knot. You may have to adjust the loops with your fingers as you pull to get them to line up nice and tight.
From here, you can knot the ends of the cord close to the sliding closure, trim, and secure with either glue or a thread burner. Or, you can leave the cords a little long and add knots and/or beads to the end.