You can add loose stones to designs in unique ways by creating a backless peyote-stitch bezel.
You can add loose stones to designs in unique ways by creating a backless peyote-stitch bezel. These bezels can be created in coordinating colors to make the stones truly stand out in designs. The small seed beads of the bezel make it easier to stitch the stones into designs. This technique is a great way to enhance the popular Swarovski Rivoli stone, which is what we'll be using in this tutorial.
When starting the bezel, the number of rows of peyote stitch needed will vary depending on the stone you are bezeling around and the seed beads you use. 11/0 Delicas or tube beads work great for the first few rows. You can then switch to 15/0 rounds. The transtition from the cylindrical shape of the Delicas to the rounds, as well as the size difference between the two types, will allow the beads to tighten and gather around the stone as you work your way closer to the center. Refer to this PDF diagram for a chart that includes the number of seed beads and rows needed for common Rivoli sizes.
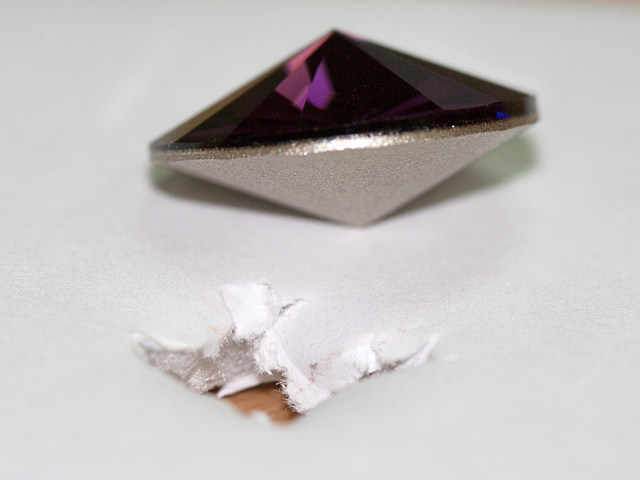
Thread a five to six foot length of KO beading thread onto a fine needle, size 13. Add enough 11/0 seed beads to fit around the widest part of the stone. The rows need to have an even number of beads, so if the best number is an odd amount of beads, always add a bead rather than removing one. It is better for the first row to be a little loose rather than too tight. If it is too tight, it won't fit around your stone. We are using an 18mm Rivoli and 46 11/0 Delicas.
It can be tricky to measure this first row of beads, so to help them nest up close enough to the widest part of the stone, you can make a hole in a piece of cardboard, large enough that the back of the stone or Rivoli will fit through. Allow the widest part of the stone to sit near the surface.
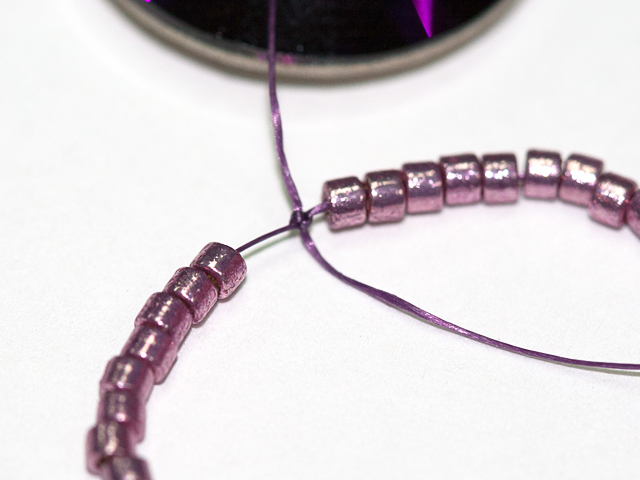
Tie the first row of seed beads together in a circle with a square knot. If you tend to stitch with tight tension, add a little slack to the loop. The slack should be the length of one seed bead or a little more. You will be able to gather up the slack in your stitches as you progress, but if it is too tight to begin with it may not fit your stone when it's done. Make sure to leave a tail that is approximately 12 inches long.
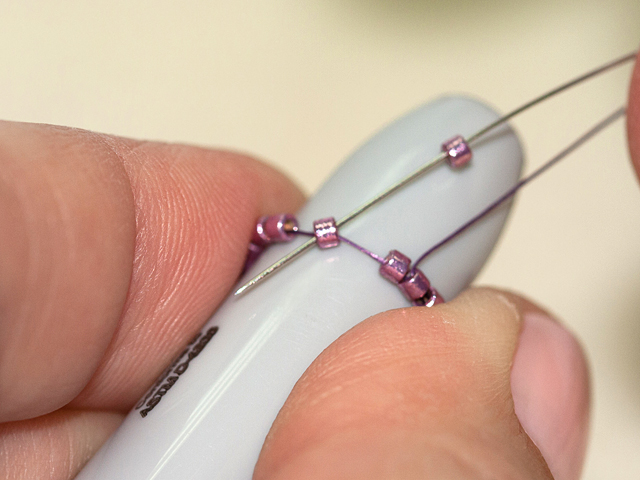
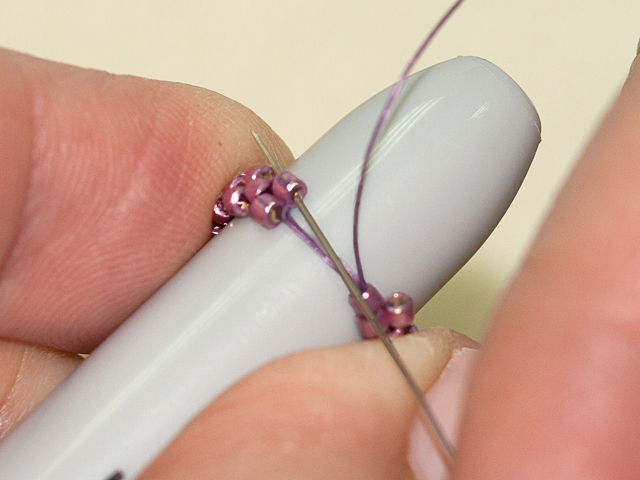
Add one row of tubular peyote to the loop. For help with this stich, please see our Tutorial Video. Use a pen or another similar object to help keep the peyote stitch from turning as you go. This will also help to keep this new row of beads to one side, which will keep it from twisting. We ran the needle through a couple beads before beginning the row to hide the knot. Here, you can see the thread path for beginning this row. Put a Delica on the needle, skip the next bead in the loop and then thread the needle through the next bead.
Pull the thread to make the new bead stack next to the skipped bead as pictured here.
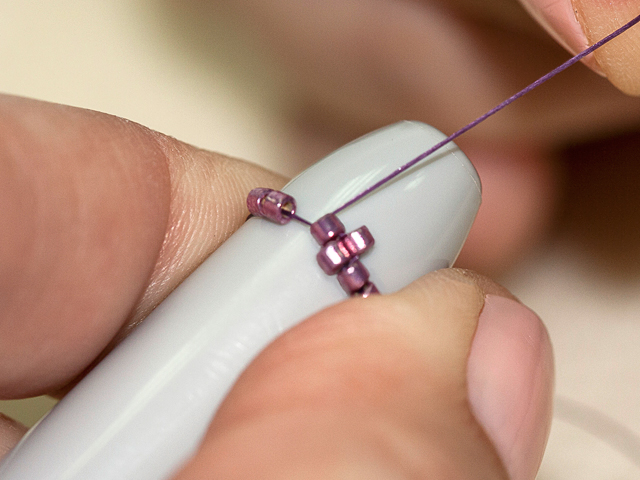
Here we have added a few more beads to the row. You can see the staggered pattern of the peyote stitch taking form. The beads that stack are referred to as up beads.
As the new beads are added, the first loop of beads becomes staggered, creating rows one and two. The beads added to the first loop become row three. The middle row will become the center row of the bezel.
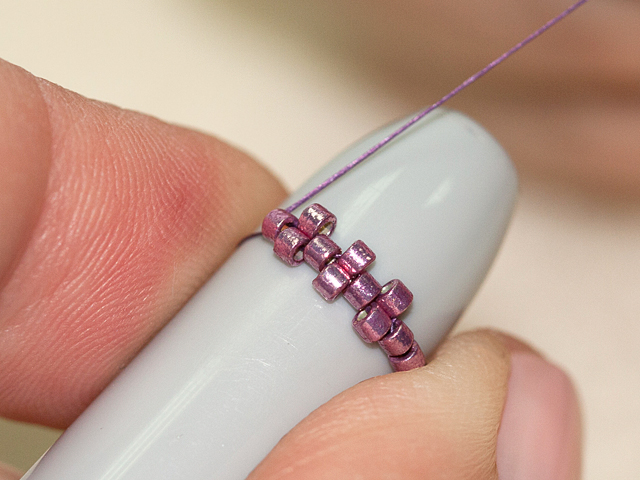
Now we're ready to add rows to the front of the bezel. To add a row, you will step up by threading the needle through the next up bead. You can see we have a lot of slack between the starting point and the last bead. This will cinch up some as you step up and even more as you continue adding rows.
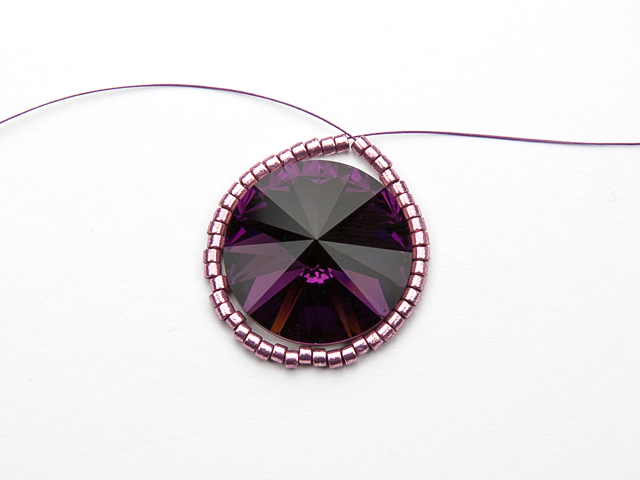
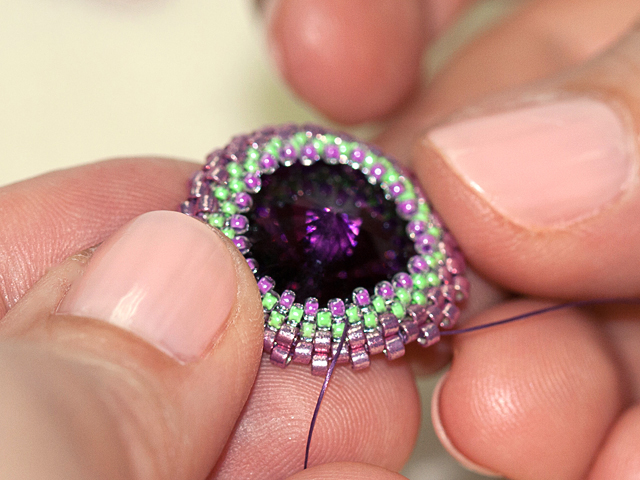
Depending on the size of stone you are using, you may want to continue with more Delica rows, but for our example, we are ready to add 15/0 rounds. Continue adding rows as needed. Make sure to step up for each new row.
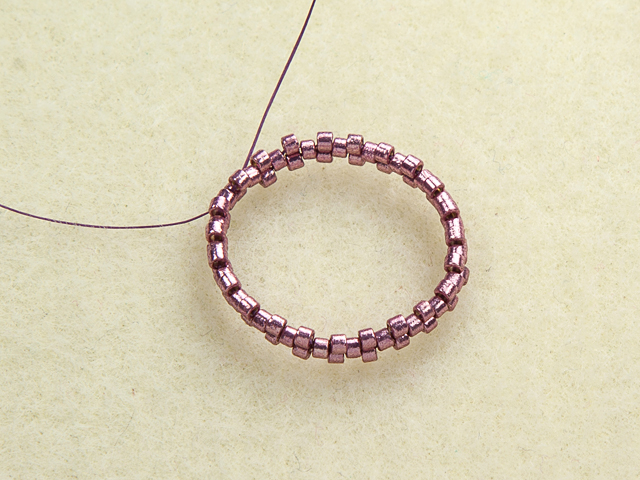
Check to see how the beads look on the front of the stone or Rivoli. We added three rows of 15/0 round beads for our example.
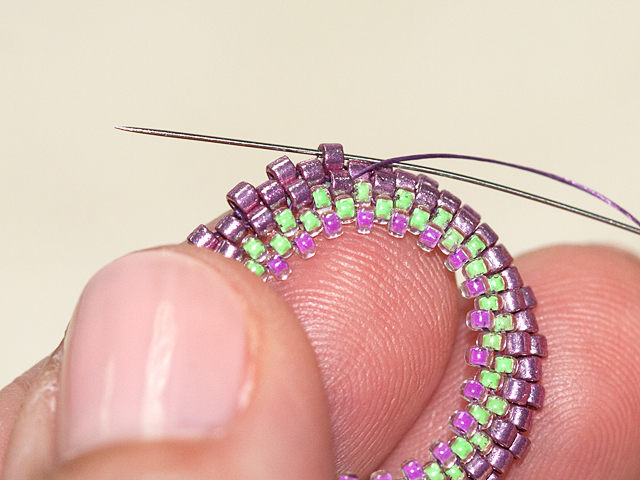
Be sure to check the fit of the bezel from the back, as well.
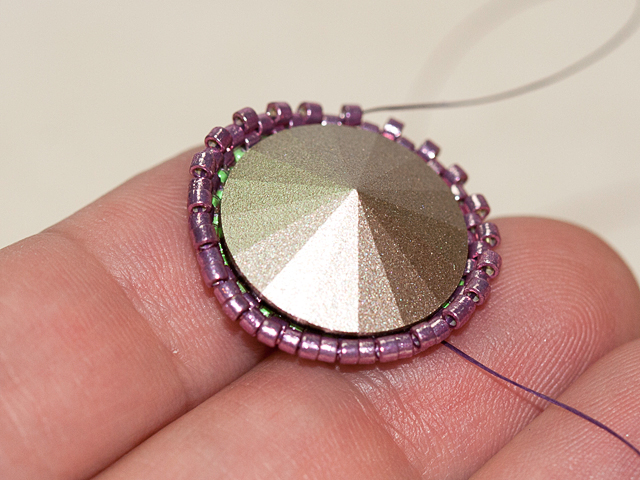
Once the front has as many rows as you like, you can start the back of the bezel. When you are ready to start the back side, weave the thread through the beads to the other edge.
Make sure the thread is exiting out of an up bead in a comfortable direction for you to stitch.
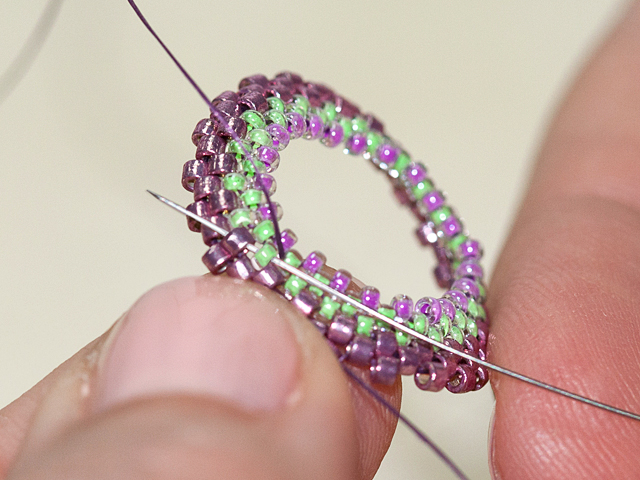
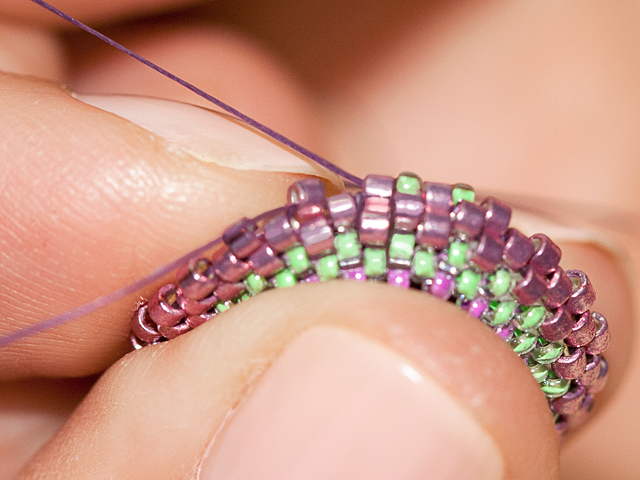
Use 15/0 rounds as you did for the front of the bezel. Place the stone or Rivoli in the bezel and stitch as many rows as needed, gathering and cinching the beads around the stone as you go.
Our back is now complete. You can use the tails of the thread for further construction or embellishment, if you prefer. Or you can just tie them off.
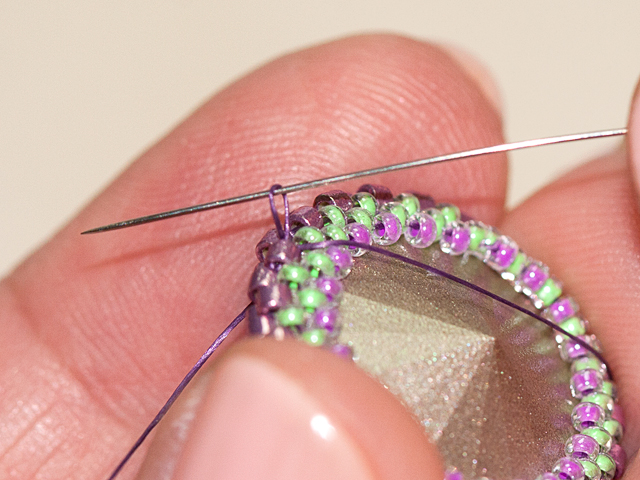
Finish by knotting the tails to the existing stitches in the bezel. To do this, run the needle under the existing thread where the thread is exiting the bead. See our tutorial for Bead Weaving Basics for more help with this technique.
Pull the thread until it forms a small loop. Thread the needle through the loop and pull it tight. This will form a knot around the thread. Thread the needle through some beads to hide the tail and trim.
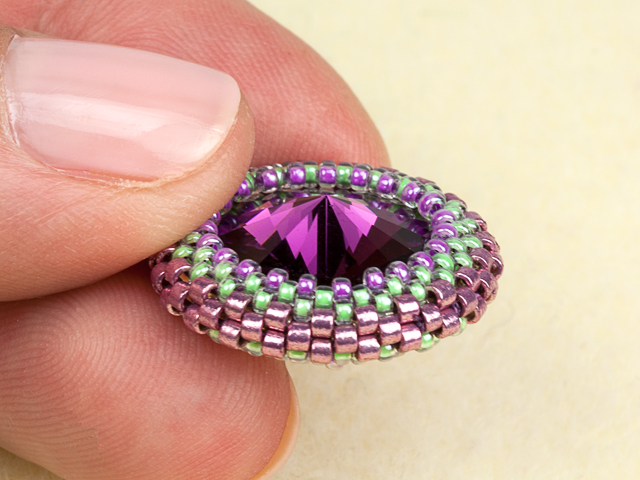
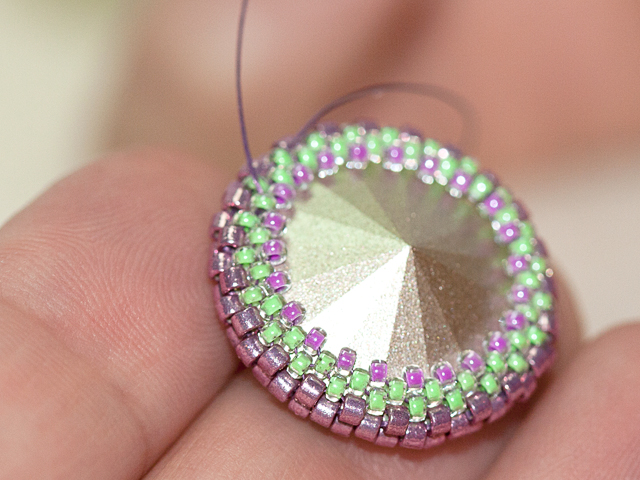
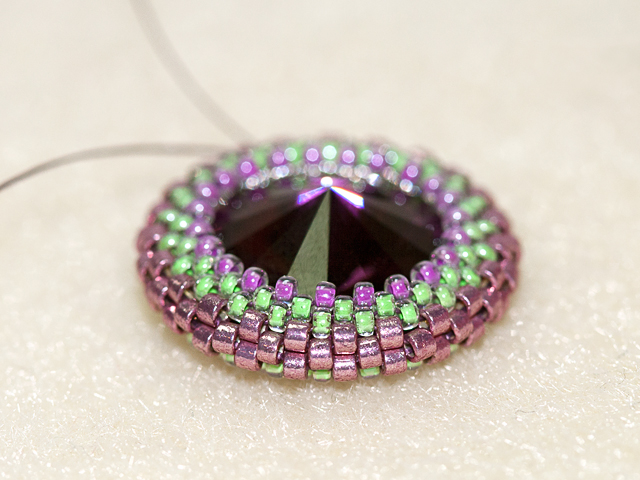
You now have a finished bezeled rivoli. To see an example of how you can use these custom bezels in designs, check out our Blooming Stars Necklace.
Add all available items to your cart at once or edit the quantities below.
Any items with quantities lower than stated minimums will default to the minimum in your cart.
Nice choice! All or most of the products needed for this project are shown
below with quantities. Sometimes we sell out of components and aren’t able to order more from
the manufacturer (we know, it is very disappointing to us, too). Use the opportunity to mix up
the design and make it yours by substituting similar products or altering the entire color
scheme—it’s up to you!
Please wait while we add the products to your cart.
How to Make an Open Back Peyote Bezel
Use It For Rivolis and More
designed byArtbeads
Skill LevelAdvanced (or at least patient)
TechniqueSeed-Beading
Time4-6 Hours
You can add loose stones to designs in unique ways by creating a backless peyote-stitch bezel.
You can add loose stones to designs in unique ways by creating a backless peyote-stitch bezel. These bezels can be created in coordinating colors to make the stones truly stand out in designs. The small seed beads of the bezel make it easier to stitch the stones into designs. This technique is a great way to enhance the popular Swarovski Rivoli stone, which is what we'll be using in this tutorial.
Supplies
The BeadSmith Smoke Grey FireLine - 125 Yards (6-Pound Test)
Code STRNG-0004
$31.09
×1
The BeadSmith 13 Long English Beading Needles 4-Pack
When starting the bezel, the number of rows of peyote stitch needed will vary depending on the stone you are bezeling around and the seed beads you use. 11/0 Delicas or tube beads work great for the first few rows. You can then switch to 15/0 rounds. The transtition from the cylindrical shape of the Delicas to the rounds, as well as the size difference between the two types, will allow the beads to tighten and gather around the stone as you work your way closer to the center. Refer to this PDF diagram for a chart that includes the number of seed beads and rows needed for common Rivoli sizes.
Thread a five to six foot length of KO beading thread onto a fine needle, size 13. Add enough 11/0 seed beads to fit around the widest part of the stone. The rows need to have an even number of beads, so if the best number is an odd amount of beads, always add a bead rather than removing one. It is better for the first row to be a little loose rather than too tight. If it is too tight, it won't fit around your stone. We are using an 18mm Rivoli and 46 11/0 Delicas.
It can be tricky to measure this first row of beads, so to help them nest up close enough to the widest part of the stone, you can make a hole in a piece of cardboard, large enough that the back of the stone or Rivoli will fit through. Allow the widest part of the stone to sit near the surface.
Tie the first row of seed beads together in a circle with a square knot. If you tend to stitch with tight tension, add a little slack to the loop. The slack should be the length of one seed bead or a little more. You will be able to gather up the slack in your stitches as you progress, but if it is too tight to begin with it may not fit your stone when it's done. Make sure to leave a tail that is approximately 12 inches long.
Add one row of tubular peyote to the loop. For help with this stich, please see our Tutorial Video. Use a pen or another similar object to help keep the peyote stitch from turning as you go. This will also help to keep this new row of beads to one side, which will keep it from twisting. We ran the needle through a couple beads before beginning the row to hide the knot. Here, you can see the thread path for beginning this row. Put a Delica on the needle, skip the next bead in the loop and then thread the needle through the next bead.
Pull the thread to make the new bead stack next to the skipped bead as pictured here.
Here we have added a few more beads to the row. You can see the staggered pattern of the peyote stitch taking form. The beads that stack are referred to as up beads.
As the new beads are added, the first loop of beads becomes staggered, creating rows one and two. The beads added to the first loop become row three. The middle row will become the center row of the bezel.
Now we're ready to add rows to the front of the bezel. To add a row, you will step up by threading the needle through the next up bead. You can see we have a lot of slack between the starting point and the last bead. This will cinch up some as you step up and even more as you continue adding rows.
Depending on the size of stone you are using, you may want to continue with more Delica rows, but for our example, we are ready to add 15/0 rounds. Continue adding rows as needed. Make sure to step up for each new row.
Check to see how the beads look on the front of the stone or Rivoli. We added three rows of 15/0 round beads for our example.
Be sure to check the fit of the bezel from the back, as well.
Once the front has as many rows as you like, you can start the back of the bezel. When you are ready to start the back side, weave the thread through the beads to the other edge.
Make sure the thread is exiting out of an up bead in a comfortable direction for you to stitch.
Use 15/0 rounds as you did for the front of the bezel. Place the stone or Rivoli in the bezel and stitch as many rows as needed, gathering and cinching the beads around the stone as you go.
Our back is now complete. You can use the tails of the thread for further construction or embellishment, if you prefer. Or you can just tie them off.
Finish by knotting the tails to the existing stitches in the bezel. To do this, run the needle under the existing thread where the thread is exiting the bead. See our tutorial for Bead Weaving Basics for more help with this technique.
Pull the thread until it forms a small loop. Thread the needle through the loop and pull it tight. This will form a knot around the thread. Thread the needle through some beads to hide the tail and trim.
You now have a finished bezeled rivoli. To see an example of how you can use these custom bezels in designs, check out our Blooming Stars Necklace.