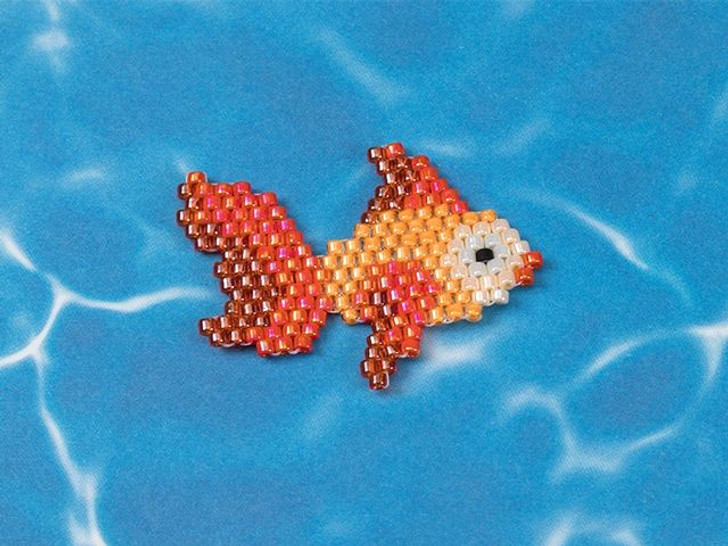
How sweet is this goldfish? Her colors are so vibrant! I'd wear this piece as a pin on a black sweater or denim jacket to make the colors really pop.
TOHO Treasure seed beads feature amazing colors that really draw attention. Cheri paired some splashy red and orange colors to make this cute brick stitch goldfish. Once you learn the techniques for this piece, you can come up with all kinds of different critters to create. You'll love working with the Treasures, too, because they line up nicely and are very consistent. See more inspiration for small brick stitch pieces and even some peyote stitch projects in this Artbeads Cafe episode.
Working with about two yards of thread, add a stopper bead with a two-foot tail (you will use the tail to add more to your brick stitch later). The stopper bead will help you keep track of orientation when you are flipping your project. If you prefer, you can start with a shorter tail and add a new thread later.
To start the brick stitch, make a ladder stitch with one TOHO Treasure 11/0 opaque pastel cantaloupe seed bead, two TOHO Treasure 11/0 opaque lustered Navajo white seed beads, one cantaloupe seed bead, seven TOHO Treasure 11/0 Luminous neon tangerine seed beads, three TOHO Treasure 11/0 opaque-rainbow pumpkin seed beads, and three TOHO Treasure 11/0 tropical sunset-lined crystal luster seed beads, as shown in fig. 1 of the Cleo PDF Diagram. You will start building your brick stitch toward the bottom of the goldfish.
Continue row three with an increasing brick stitch, as shown in fig. 3 of the PDF diagram. Finish the row with a decrease. Start row four with a decrease and finish the row with an increase.
Weave your thread so that it is coming out of the third bead in the row, as shown in fig. 4 of the PDF Diagram. Start the next row with an increasing brick stitch, adding two cantaloupe beads, two tangerine beads, two pumpkin beads, one tropical sunset bead, one pumpkin bead, and one cantaloupe bead. Start the next row with a decrease, adding one tropical sunset bead, two pumpkin beads, and three cantaloupe beads.
Weave your thread so that it is coming out of the third bead in the row, as shown in fig. 5 of the PDF Diagram. Start the row with a decrease, adding two pumpkin beads and one tropical sunset bead. Start the next row with an increase and end with a decrease. Weave through the beads in this row so that you're coming out of the first tropical sunset bead. Make an increase for the next row and use only two tropical sunset beads for this row. Add one tropical sunset bead and go back through the same bead in the previous row. Go up through the next bead in the previous row and down through the new bead added.
Weave your thread through the body of the goldfish, as shown in fig. 6 of the PDF Diagram. Start a decrease brick stitch, and use three pumpkin seed beads and three tropical sunset beads to end with an increase. Add another sunset bead to the row using ladder stitch. Start the next row with a decrease and use two sunset beads and four pumpkin beads to end with a decrease. Start the next row with a decrease and only use three pumpkin beads.
Turn your work over so the fish is right side up and continue building the top. Use your tail or start a new thread so that it is coming out of the last cantaloupe bead in the first row, as shown in fig. 7 of the PDF Diagram. Start the next row with a decrease and use three cantaloupe beads and seven tangerine beads. Weave back to the third-to-last bead in this row and start the next row with an increase. Use eight tangerine beads to end with a decrease. Start the next row with a decrease and add one pumpkin bead, four tangerine beads, and one sunset bead. Start the next row with a decrease, and use two sunset beads and three pumpkin beads.
Start the next row with a decrease, as shown in fig. 8 of the PDF Diagram. Use two pumpkin beads and two sunset beads. Start the next row with a decrease and use two sunset beads and one pumpkin bead. Start the next row with a decrease and use one pumpkin bead and two sunset beads to end on an increase. Make the next row with an increase using one sunset bead and one pumpkin bead.
Weave your thread through the body of the goldfish to create the top of the tail, as shown in fig. 9 of the PDF Diagram. Start the row with a decrease and use three pumpkin beads and two sunset beads. Start the next row with an increase using two sunset beads. Add an extra sunset bead to the outside edge using the ladder stitch. Weave back so your coming back out of the inside sunset bead. Continue the stitch with three pumpkin beads to end on a decrease. Start the next row with a decrease using four pumpkin beads and two sunset beads to end on an increase. Start the next row with an increase using one sunset bead and five pumpkin beads to end on a decrease. Start the next row with a decrease using four pumpkin beads and one sunset bead to end on a decrease. Start the next row on an increase and use only one sunset bead and three pumpkin beads. Weave up through the first pumpkin bead in this row and add just one pumpkin bead to the final row. Weave into the body of the fish to secure and trim your thread
Add all available items to your cart at once or edit the quantities below.
Any items with quantities lower than stated minimums will default to the minimum in your cart.
Nice choice! All or most of the products needed for this project are shown
below with quantities. Sometimes we sell out of components and aren’t able to order more from
the manufacturer (we know, it is very disappointing to us, too). Use the opportunity to mix up
the design and make it yours by substituting similar products or altering the entire color
scheme—it’s up to you!
Please wait while we add the products to your cart.
Cleo
TOHO Treasure Seed Bead Brick Stitch Goldfish
designed byCheri Carlson
Skill LevelIntermediate
TechniqueSeed-Beading
Time1-3 Hours
Approximate Size1 1/2 Inches
How sweet is this goldfish? Her colors are so vibrant! I'd wear this piece as a pin on a black sweater or denim jacket to make the colors really pop.
TOHO Treasure seed beads feature amazing colors that really draw attention. Cheri paired some splashy red and orange colors to make this cute brick stitch goldfish. Once you learn the techniques for this piece, you can come up with all kinds of different critters to create. You'll love working with the Treasures, too, because they line up nicely and are very consistent. See more inspiration for small brick stitch pieces and even some peyote stitch projects in this Artbeads Cafe episode.
Supplies
Tulip Assorted Beading Needles (4 pack)
Code NEED-28
$16.49
×1
TOHO Treasure 11/0 Opaque Frosted Jet Seed Bead 2.5-Inch Tube
Code TTB11-49F
$4.27
×1
TOHO Treasure 11/0 Opaque-Rainbow Pumpkin Seed Bead 2.5-Inch Tube
Code TTB11-410
$2.00
$3.97
×1
TOHO Treasure 11/0 Opaque-Pastel Cantaloupe Seed Bead 2.5-Inch Tube
Code TTB11-812
$5.19
×1
Clearance - Was $1.09 - Silver-Plated 3/4-Inch Pin Back with 2 Holes (10pc pack)
TOHO Treasure 11/0 Opaque-Lustered Navajo White Seed Bead 2.5-Inch Tube
Code TTB11-122
$3.00
$4.47
×1
The BeadSmith Crystal Clear FireLine - 50 Yards (4-Pound Test)
Code FL04CR50
$13.69
×1
Step-by-Step Instructions
Working with about two yards of thread, add a stopper bead with a two-foot tail (you will use the tail to add more to your brick stitch later). The stopper bead will help you keep track of orientation when you are flipping your project. If you prefer, you can start with a shorter tail and add a new thread later.
To start the brick stitch, make a ladder stitch with one TOHO Treasure 11/0 opaque pastel cantaloupe seed bead, two TOHO Treasure 11/0 opaque lustered Navajo white seed beads, one cantaloupe seed bead, seven TOHO Treasure 11/0 Luminous neon tangerine seed beads, three TOHO Treasure 11/0 opaque-rainbow pumpkin seed beads, and three TOHO Treasure 11/0 tropical sunset-lined crystal luster seed beads, as shown in fig. 1 of the Cleo PDF Diagram. You will start building your brick stitch toward the bottom of the goldfish.
Continue row three with an increasing brick stitch, as shown in fig. 3 of the PDF diagram. Finish the row with a decrease. Start row four with a decrease and finish the row with an increase.
Weave your thread so that it is coming out of the third bead in the row, as shown in fig. 4 of the PDF Diagram. Start the next row with an increasing brick stitch, adding two cantaloupe beads, two tangerine beads, two pumpkin beads, one tropical sunset bead, one pumpkin bead, and one cantaloupe bead. Start the next row with a decrease, adding one tropical sunset bead, two pumpkin beads, and three cantaloupe beads.
Weave your thread so that it is coming out of the third bead in the row, as shown in fig. 5 of the PDF Diagram. Start the row with a decrease, adding two pumpkin beads and one tropical sunset bead. Start the next row with an increase and end with a decrease. Weave through the beads in this row so that you're coming out of the first tropical sunset bead. Make an increase for the next row and use only two tropical sunset beads for this row. Add one tropical sunset bead and go back through the same bead in the previous row. Go up through the next bead in the previous row and down through the new bead added.
Weave your thread through the body of the goldfish, as shown in fig. 6 of the PDF Diagram. Start a decrease brick stitch, and use three pumpkin seed beads and three tropical sunset beads to end with an increase. Add another sunset bead to the row using ladder stitch. Start the next row with a decrease and use two sunset beads and four pumpkin beads to end with a decrease. Start the next row with a decrease and only use three pumpkin beads.
Turn your work over so the fish is right side up and continue building the top. Use your tail or start a new thread so that it is coming out of the last cantaloupe bead in the first row, as shown in fig. 7 of the PDF Diagram. Start the next row with a decrease and use three cantaloupe beads and seven tangerine beads. Weave back to the third-to-last bead in this row and start the next row with an increase. Use eight tangerine beads to end with a decrease. Start the next row with a decrease and add one pumpkin bead, four tangerine beads, and one sunset bead. Start the next row with a decrease, and use two sunset beads and three pumpkin beads.
Start the next row with a decrease, as shown in fig. 8 of the PDF Diagram. Use two pumpkin beads and two sunset beads. Start the next row with a decrease and use two sunset beads and one pumpkin bead. Start the next row with a decrease and use one pumpkin bead and two sunset beads to end on an increase. Make the next row with an increase using one sunset bead and one pumpkin bead.
Weave your thread through the body of the goldfish to create the top of the tail, as shown in fig. 9 of the PDF Diagram. Start the row with a decrease and use three pumpkin beads and two sunset beads. Start the next row with an increase using two sunset beads. Add an extra sunset bead to the outside edge using the ladder stitch. Weave back so your coming back out of the inside sunset bead. Continue the stitch with three pumpkin beads to end on a decrease. Start the next row with a decrease using four pumpkin beads and two sunset beads to end on an increase. Start the next row with an increase using one sunset bead and five pumpkin beads to end on a decrease. Start the next row with a decrease using four pumpkin beads and one sunset bead to end on a decrease. Start the next row on an increase and use only one sunset bead and three pumpkin beads. Weave up through the first pumpkin bead in this row and add just one pumpkin bead to the final row. Weave into the body of the fish to secure and trim your thread