Artbeads Designer Wire works well for wire weaving. Try making our exact project or customize it as you like.
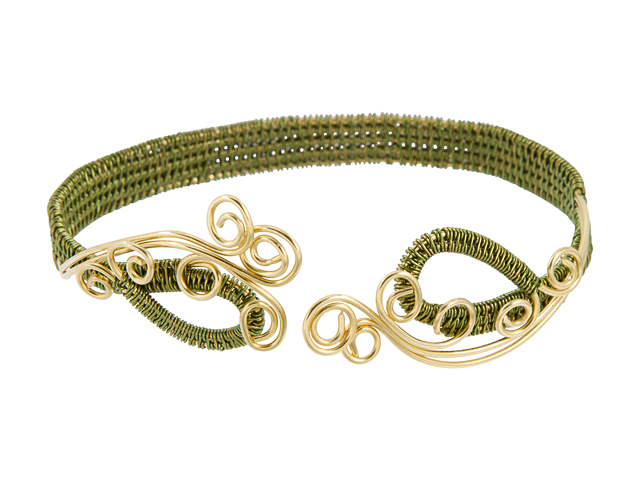
Woven wire creates the captivating look of Rolling Fields in this charming bracelet. Pat from our Artbeads Creative Services Team used the modified Soumak weave to create this amazing piece of jewelry with our Artbeads Designer Wire. Make sure to watch this Artbeads Cafe episode to see more of this bracelet and learn how to make it in your favorite colors
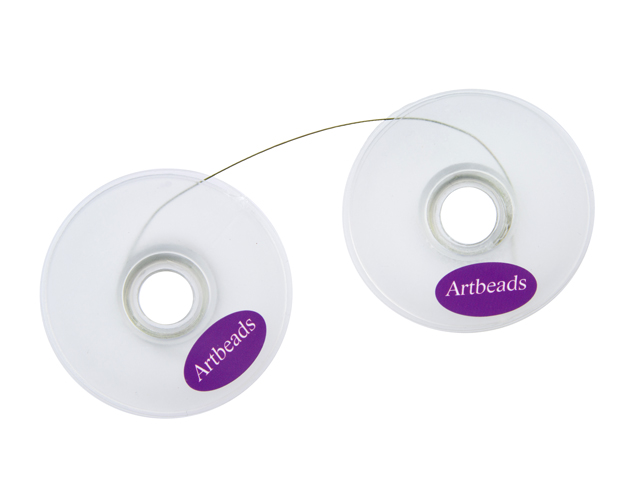
Wind six yards of 28 gauge Artbeads Designer Wire in Olive Green onto a bobbin. Make sure not to kink your wire while doing this. Pull another three yards of wire from the spool and cut to release it. Wind the cut edge of the wire onto another bobbin. Your wire should continue uncut, from one bobbin to the other. This allows you to easily weave both ends of the 28 gauge wire around your base wires.
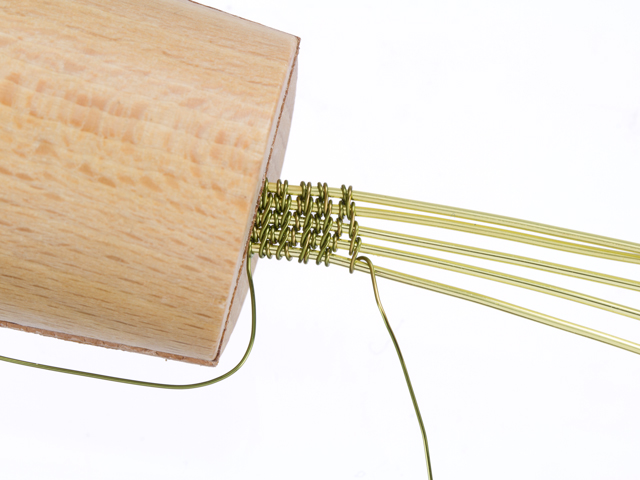
Cut five 9-inch pieces of 20 gauge Artbeads Designer Wire in Yellow Gold. Use nylon jaw pliers to straighten the wires so they lay parallel to each other with minimum gaps, but make sure the ends do not cross each other. You can use masking tape to hold them together or insert the ends into a wooden ring wire clamp from Artistic Wire. Begin weaving using the bobbin with the most wire spooled around it. Refer to the video for how to weave the 28 gauge wire around the base wires. This technique is known as the modified Soumak weave.
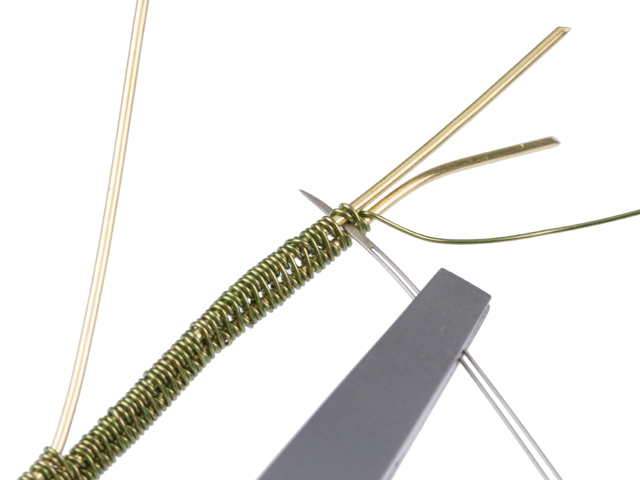
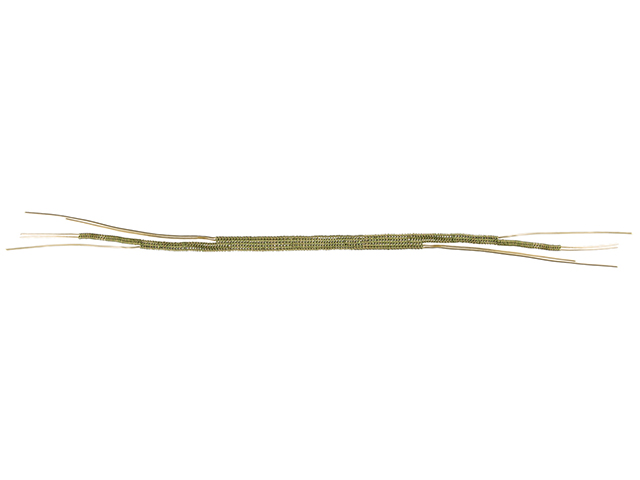
Weave the five base wires together until you have about four inches of weave. Be sure to constantly press the fabric of the weave down as you work, so the layers stay tightly packed together with no gaps. Pull the first two base wires aside slightly and continue weaving the remaining three wires for about 1.25 inches. Slightly pull aside the outer base wire on the other side, and continue weaving the remaining center two wires for another 1.25 inches. This picture shows you how this should look once both ends have been woven.
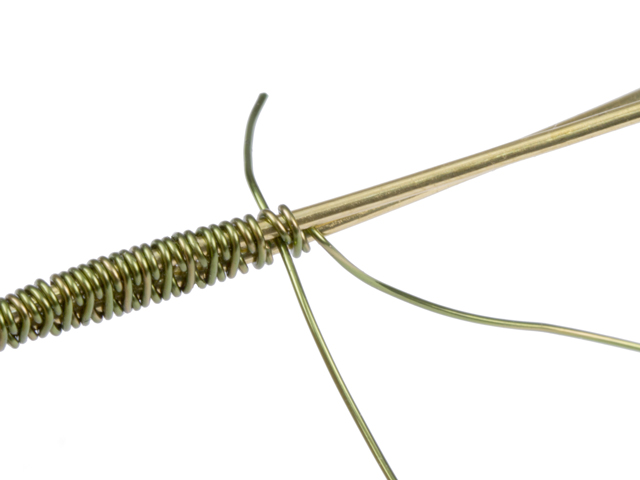
Use a stiff needle or beading awl to separate the weave at the very end of your base wires.
Pass the tail of the wire down through the weave where you inserted your needle or awl and trim closely. Push any sharp points aside into the weave.
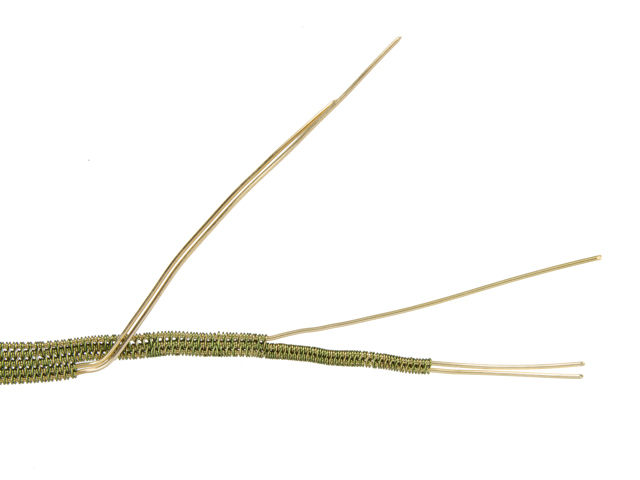
Remove your piece from the ring clamp, or remove the tape if you used masking tape. Using the wire on the second bobbin, which should still be at the start of your bracelet, weave the other end of the bracelet as you did in step three, only in reverse as pictured. So, the two outer wires you pull aside first will be on the opposite side from the other end. Continue weaving the remaining three wires for 1.25 inches. Pull aside the outer base wire on the other side, and continue weaving the center two wires for another 1.25 inches. Repeat steps four and five to secure the wire on this end.
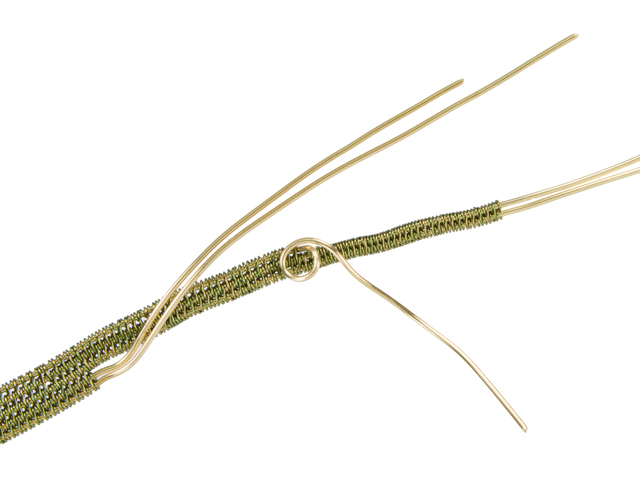
Steps seven through ten show you how we curved and coiled the ends to create a swirling effect on the ends of the bracelet. You can follow this arrangement or create your own. The Artbeads Cafe video referenced above also shows you how to create the curves and coils for this bracelet. Start by pulling the long section of two base wires up and across the bracelet slightly. Pull the section of one base wire up slightly, too.
Coil the section of one base wire into a loop close to where the weave stops. Cuvrve the two wires down so that they are close to the single wire you just coiled.
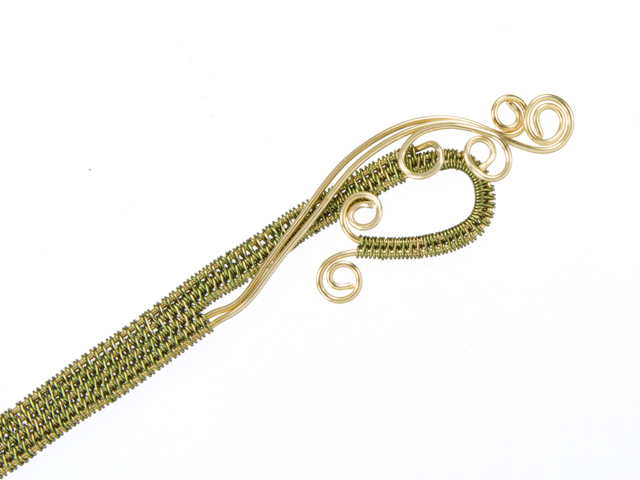
Use nylon jaw pliers to curve and flatten the end of the woven section. Use round nose pliers to start creating a spiral with the inside wire of this section. Once you have the spiral started, switch to using your nylon jaw pliers to coil the spiral to your liking. Make sure to curve your long section of two base wires up and around the curve in the woven section.
Create spirals with all remaining wire ends. Repeat steps seven through ten on the other end of the bracelet.
Curve your finished piece around a soda can or other cylinder to form a bracelet shape that will fit around your wrist.
List of Components: Artbeads Designer Wire - Yellow Gold Non-Tarnish 20 Gauge (21 ft. spool) (ADW0081, qty 1) Artbeads Designer Wire - Olive Green Non-Tarnish 28 Gauge (120 ft. spool) (ADW0135, qty 1)
Add all available items to your cart at once or edit the quantities below.
Any items with quantities lower than stated minimums will default to the minimum in your cart.
Nice choice! All or most of the products needed for this project are shown
below with quantities. Sometimes we sell out of components and aren’t able to order more from
the manufacturer (we know, it is very disappointing to us, too). Use the opportunity to mix up
the design and make it yours by substituting similar products or altering the entire color
scheme—it’s up to you!
Please wait while we add the products to your cart.
Rolling Fields
Wire-Woven Green and Gold Bracelet
designed byPat
Skill LevelIntermediate
TechniqueWire-Working
Time4-6 Hours
Approximate SizeWrist Size: 7 Inches
Artbeads Designer Wire works well for wire weaving. Try making our exact project or customize it as you like.
Woven wire creates the captivating look of Rolling Fields in this charming bracelet. Pat from our Artbeads Creative Services Team used the modified Soumak weave to create this amazing piece of jewelry with our Artbeads Designer Wire. Make sure to watch this Artbeads Cafe episode to see more of this bracelet and learn how to make it in your favorite colors
Supplies
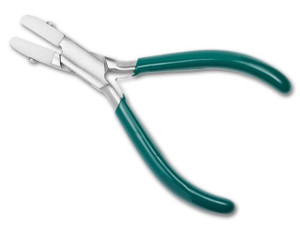
Ergonomic Round Nose Pliers
Code TOOL-127
$10.63
$12.99
×1
Beading Awl
Code TOOL-117
$2.98
$4.92
×1
Nylon Jaw Jewelry Pliers
Code TOOL-105
$17.66
$24.99
×1
Step-by-Step Instructions
Wind six yards of 28 gauge Artbeads Designer Wire in Olive Green onto a bobbin. Make sure not to kink your wire while doing this. Pull another three yards of wire from the spool and cut to release it. Wind the cut edge of the wire onto another bobbin. Your wire should continue uncut, from one bobbin to the other. This allows you to easily weave both ends of the 28 gauge wire around your base wires.
Cut five 9-inch pieces of 20 gauge Artbeads Designer Wire in Yellow Gold. Use nylon jaw pliers to straighten the wires so they lay parallel to each other with minimum gaps, but make sure the ends do not cross each other. You can use masking tape to hold them together or insert the ends into a wooden ring wire clamp from Artistic Wire. Begin weaving using the bobbin with the most wire spooled around it. Refer to the video for how to weave the 28 gauge wire around the base wires. This technique is known as the modified Soumak weave.
Weave the five base wires together until you have about four inches of weave. Be sure to constantly press the fabric of the weave down as you work, so the layers stay tightly packed together with no gaps. Pull the first two base wires aside slightly and continue weaving the remaining three wires for about 1.25 inches. Slightly pull aside the outer base wire on the other side, and continue weaving the remaining center two wires for another 1.25 inches. This picture shows you how this should look once both ends have been woven.
Use a stiff needle or beading awl to separate the weave at the very end of your base wires.
Pass the tail of the wire down through the weave where you inserted your needle or awl and trim closely. Push any sharp points aside into the weave.
Remove your piece from the ring clamp, or remove the tape if you used masking tape. Using the wire on the second bobbin, which should still be at the start of your bracelet, weave the other end of the bracelet as you did in step three, only in reverse as pictured. So, the two outer wires you pull aside first will be on the opposite side from the other end. Continue weaving the remaining three wires for 1.25 inches. Pull aside the outer base wire on the other side, and continue weaving the center two wires for another 1.25 inches. Repeat steps four and five to secure the wire on this end.
Steps seven through ten show you how we curved and coiled the ends to create a swirling effect on the ends of the bracelet. You can follow this arrangement or create your own. The Artbeads Cafe video referenced above also shows you how to create the curves and coils for this bracelet. Start by pulling the long section of two base wires up and across the bracelet slightly. Pull the section of one base wire up slightly, too.
Coil the section of one base wire into a loop close to where the weave stops. Cuvrve the two wires down so that they are close to the single wire you just coiled.
Use nylon jaw pliers to curve and flatten the end of the woven section. Use round nose pliers to start creating a spiral with the inside wire of this section. Once you have the spiral started, switch to using your nylon jaw pliers to coil the spiral to your liking. Make sure to curve your long section of two base wires up and around the curve in the woven section.
Create spirals with all remaining wire ends. Repeat steps seven through ten on the other end of the bracelet.
Curve your finished piece around a soda can or other cylinder to form a bracelet shape that will fit around your wrist.
List of Components: Artbeads Designer Wire - Yellow Gold Non-Tarnish 20 Gauge (21 ft. spool) (ADW0081, qty 1) Artbeads Designer Wire - Olive Green Non-Tarnish 28 Gauge (120 ft. spool) (ADW0135, qty 1)