Two holes in the dagger beads within this design stabilize them and allow them to be arranged neatly along the side of the bracelet.
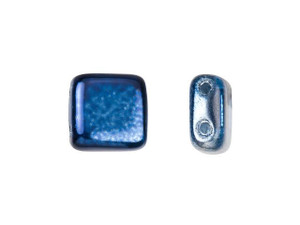
Cynthia loves playing with CzechMates two-hole beads because they work so well together She used deep blue Tile Beads and shining silver Dagger Beads in this bracelet, along with an Artbeads Designer Seed Bead Blend that adds pops of cool blue color to go along with the icy display. With a just a touch of iridescent color from crystal beads, this bracelet will put you in mind of breathtaking glaciers and deep winter waters
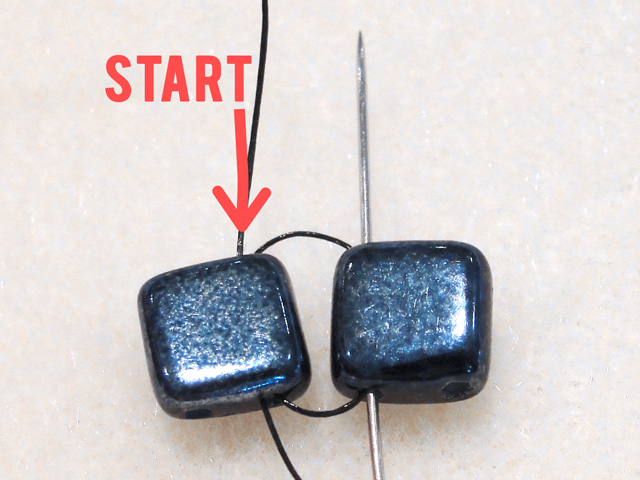
Cut approximately two yards of black KO nylon Japanese beading thread. Add a needle to the end of the thread. Go down through the stringing hole on the right side of a CzechMates glass 6mm denim mirror two-hole tile bead and then up through the hole on the left side of a second tile bead. Then, go back down through the first tile bead and up through the second bead to form a loop.
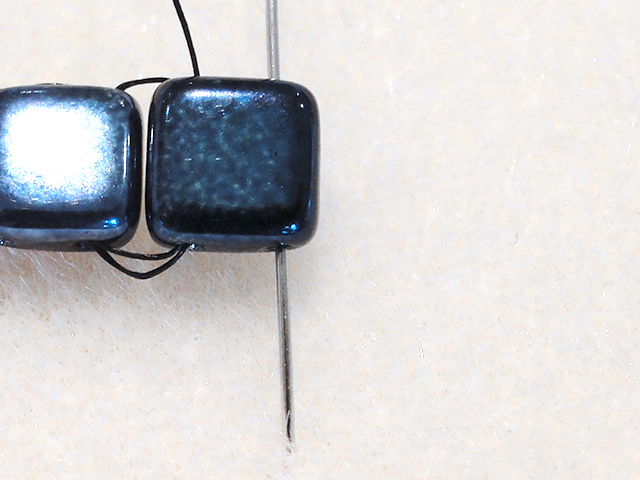
Go down through the right side of the second tile bead and repeat step one until you have the desired length for a bracelet, keeping in mind the clasp will add about 1 1/4 inch of length. Our bracelet is about seven inches long, or 25 tile beads long.
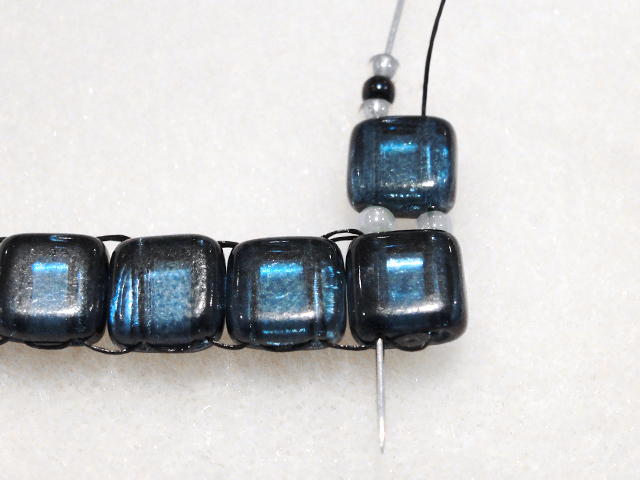
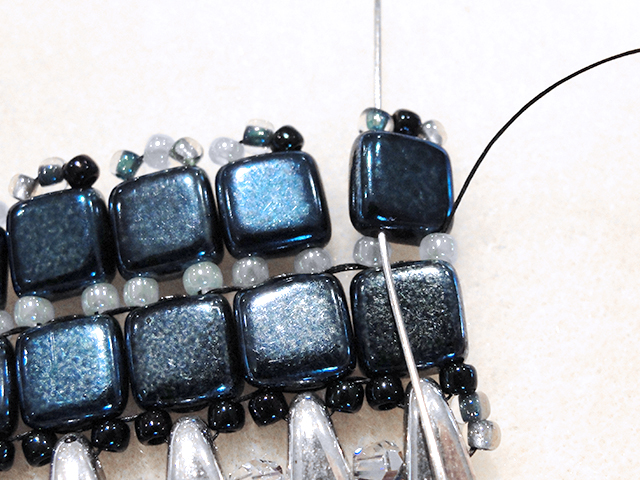
Turn your row of beads so that the thread is coming up and out on the right side of the last tile bead. Add a seed bead from the Artbeads Nordic Blues Designer Blend, followed by a tile bead and three more seed beads. Go back down through the other stringing hole of the tile bead. Add another seed bead to the thread and go back down through the corresponding stringing hole in the tile bead in the first row.
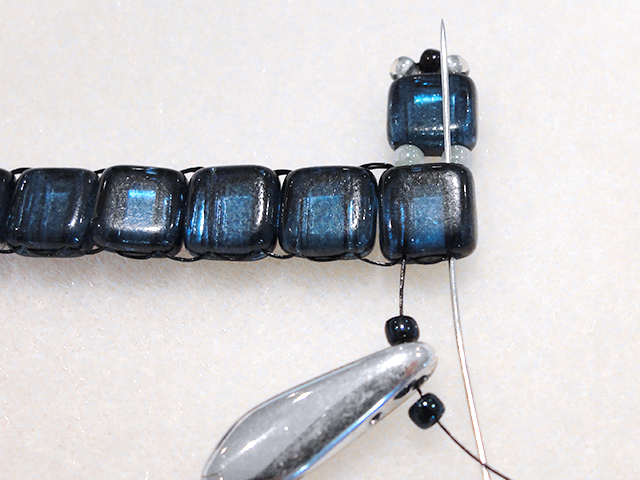
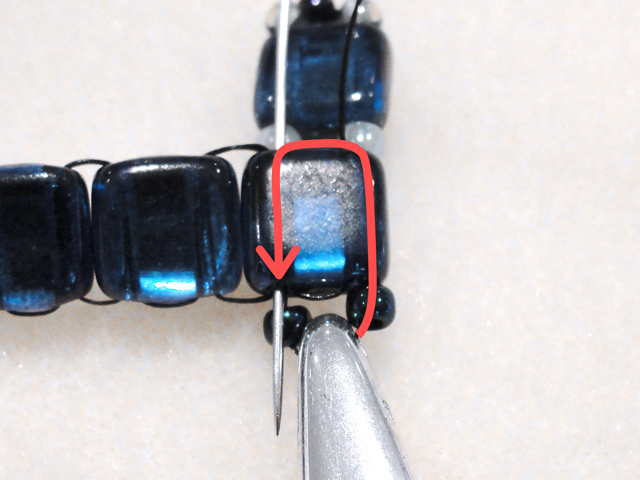
Add a seed bead, a CzechMates glass 5-6mm silver two-hole dagger bead and another seed bead to the thread. Go back up through the stringing hole on the last tile bead in the first row.
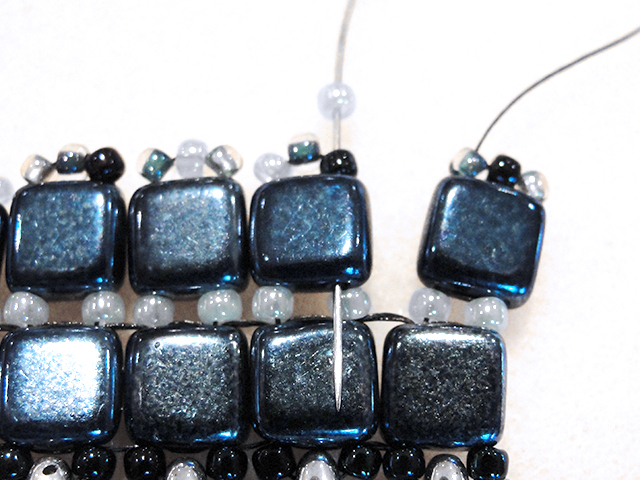
Go back down through the other stringing hole on the tile bead, directly under the seed bead. When your needle is coming out of the bottom of the tile bead, be careful not to go through the seed bead on the edge.
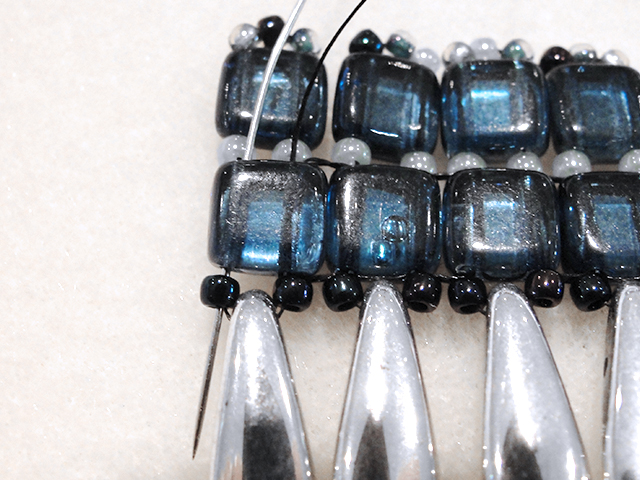
Go up through the next tile bead in the row and repeat the bead weaving pattern from steps 3-5 until you reach the end of the row.
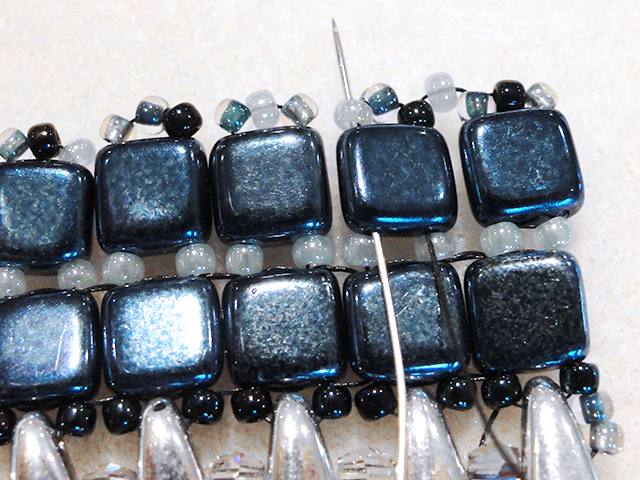
Finish the row and this time when you go through the last stringing hole of the last tile bead in the row, go through the seed bead on the bottom of the bracelet, too.
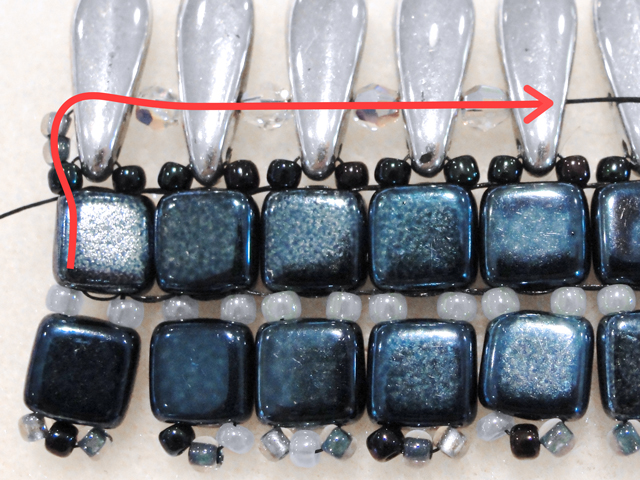
Turn your bracelet so that the dagger beads are on top. Your thread should be exiting on the edge seed bead next to the first dagger. Add two seed beads and go through the upper stringing hole of the dagger bead. Add a 3mm faceted round in Crystal AB to the thread and go through the upper stringing hole of the next dagger. Keep adding crystals in this manner until you reach the end of the bracelet.
Turn your bracelet again so that the daggers are at the bottom. Add the last two seed beads on the edge of the last dagger and go through the edge seed bead, the tile bead and the seed bead between the tile rows.
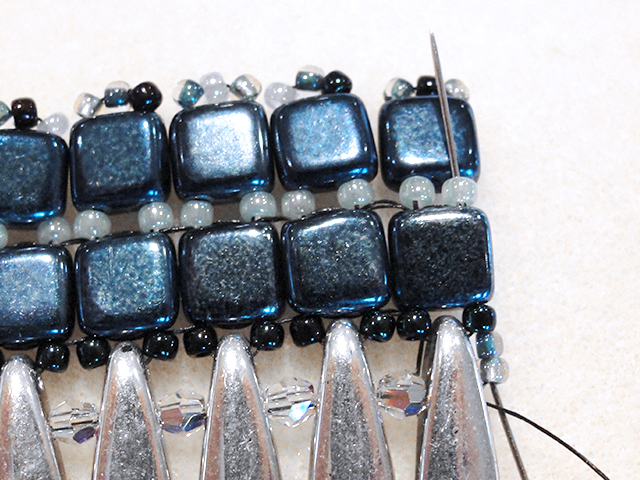
Bring your needle through the left side of the tile bead on the top row and through the corresponding seed bead.
Add a seed bead to your thread and go through the first seed bead on the next tile bead and down through the corresponding hole of the tile bead.
Go back up into the next stringing hole of the tile bead and the corresponding seed bead. Repeat steps 10-12 until you reach the end of the bracelet.
After adding the last seed bead to this row, go through the seed bead on the last tile bead and the corresponding stringing hole and then up and out of the last stringing hole on the tile bead. Do not go through the corresponding seed bead. Add 15 seed beads to the thread and then slide on the loop component of the sterling silver 13mm flat round toggle clasp over the seed beads. Bring your needle through the outside stringing hole of the last tile bead in the bottom row, toward the center of the bracelet. Go back through the tile beads and the 15 seed beads to reinforce your loop. Weave the thread into several tile beads to finish and secure the thread. Trim.
Start a new thread to make a loop on the other end of the bracelet. Repeat Step thirteen, only this time you will add the bar component of the toggle clasp over the seed bead loop. Weave the thread into several tile beads to finish and secure the thread. Trim if necessary. Make sure to also weave the tail through the tile beads to hide and secure it.
Add all available items to your cart at once or edit the quantities below.
Any items with quantities lower than stated minimums will default to the minimum in your cart.
Nice choice! All or most of the products needed for this project are shown
below with quantities. Sometimes we sell out of components and aren’t able to order more from
the manufacturer (we know, it is very disappointing to us, too). Use the opportunity to mix up
the design and make it yours by substituting similar products or altering the entire color
scheme—it’s up to you!
Please wait while we add the products to your cart.
Misty Fjords
Misty Fjords Bracelet
designed byCynthia Kimura
Skill LevelIntermediate
TechniqueTwo-Hole and Four-Hole Beading
Time4-6 Hours
Approximate Size7 Inches
Two holes in the dagger beads within this design stabilize them and allow them to be arranged neatly along the side of the bracelet.
Cynthia loves playing with CzechMates two-hole beads because they work so well together She used deep blue Tile Beads and shining silver Dagger Beads in this bracelet, along with an Artbeads Designer Seed Bead Blend that adds pops of cool blue color to go along with the icy display. With a just a touch of iridescent color from crystal beads, this bracelet will put you in mind of breathtaking glaciers and deep winter waters
Supplies
KO Nylon Japanese Beading Thread, Black (55-Yard Spool)
Artbeads Nordic Blues Designer Blend, 11/0 TOHO Round Seed Beads
Code ADB0392
$5.24
$6.99
×1
Step-by-Step Instructions
Cut approximately two yards of black KO nylon Japanese beading thread. Add a needle to the end of the thread. Go down through the stringing hole on the right side of a CzechMates glass 6mm denim mirror two-hole tile bead and then up through the hole on the left side of a second tile bead. Then, go back down through the first tile bead and up through the second bead to form a loop.
Go down through the right side of the second tile bead and repeat step one until you have the desired length for a bracelet, keeping in mind the clasp will add about 1 1/4 inch of length. Our bracelet is about seven inches long, or 25 tile beads long.
Turn your row of beads so that the thread is coming up and out on the right side of the last tile bead. Add a seed bead from the Artbeads Nordic Blues Designer Blend, followed by a tile bead and three more seed beads. Go back down through the other stringing hole of the tile bead. Add another seed bead to the thread and go back down through the corresponding stringing hole in the tile bead in the first row.
Add a seed bead, a CzechMates glass 5-6mm silver two-hole dagger bead and another seed bead to the thread. Go back up through the stringing hole on the last tile bead in the first row.
Go back down through the other stringing hole on the tile bead, directly under the seed bead. When your needle is coming out of the bottom of the tile bead, be careful not to go through the seed bead on the edge.
Go up through the next tile bead in the row and repeat the bead weaving pattern from steps 3-5 until you reach the end of the row.
Finish the row and this time when you go through the last stringing hole of the last tile bead in the row, go through the seed bead on the bottom of the bracelet, too.
Turn your bracelet so that the dagger beads are on top. Your thread should be exiting on the edge seed bead next to the first dagger. Add two seed beads and go through the upper stringing hole of the dagger bead. Add a 3mm faceted round in Crystal AB to the thread and go through the upper stringing hole of the next dagger. Keep adding crystals in this manner until you reach the end of the bracelet.
Turn your bracelet again so that the daggers are at the bottom. Add the last two seed beads on the edge of the last dagger and go through the edge seed bead, the tile bead and the seed bead between the tile rows.
Bring your needle through the left side of the tile bead on the top row and through the corresponding seed bead.
Add a seed bead to your thread and go through the first seed bead on the next tile bead and down through the corresponding hole of the tile bead.
Go back up into the next stringing hole of the tile bead and the corresponding seed bead. Repeat steps 10-12 until you reach the end of the bracelet.
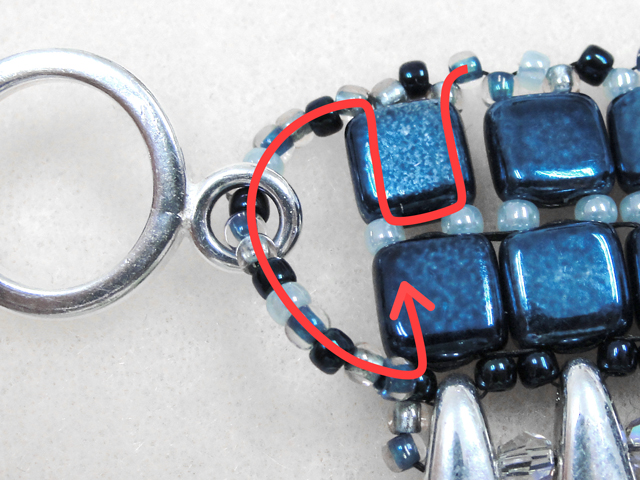
After adding the last seed bead to this row, go through the seed bead on the last tile bead and the corresponding stringing hole and then up and out of the last stringing hole on the tile bead. Do not go through the corresponding seed bead. Add 15 seed beads to the thread and then slide on the loop component of the sterling silver 13mm flat round toggle clasp over the seed beads. Bring your needle through the outside stringing hole of the last tile bead in the bottom row, toward the center of the bracelet. Go back through the tile beads and the 15 seed beads to reinforce your loop. Weave the thread into several tile beads to finish and secure the thread. Trim.
Start a new thread to make a loop on the other end of the bracelet. Repeat Step thirteen, only this time you will add the bar component of the toggle clasp over the seed bead loop. Weave the thread into several tile beads to finish and secure the thread. Trim if necessary. Make sure to also weave the tail through the tile beads to hide and secure it.