What a beautiful mask for a costume ball! And you can tell everyone you made it yourself.
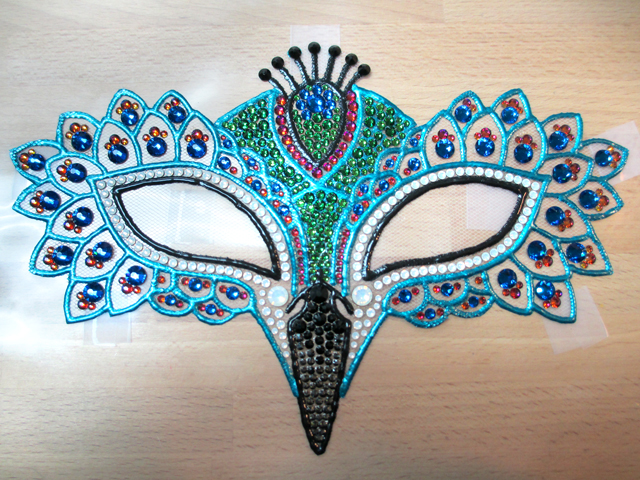
Peacocks were sacred animals to Ancient Greek gods, especially Zeus and Hera. This masquerade mask perfectly showcases why. The sparkling colors mimic the enchanting play of colors in peacock feathers that have mesmerized gods and people for ages. Wear this mask to a costume ball or Halloween party.
Note: You will need tulle and dimensional fabric paint to complete this project. Print out our PDF of the mask design in order to trace over it with dimensional fabric paint. Tape the template down to the work surface with a plastic sheet taped over it. Tape a piece of sheer tulle over the design.
Use dimensional fabric paint to trace the design onto the tulle. We outlined the eyes, beak and crest in black. The rest of the design was traced in teal. For the area between the eyes, dab the paint on and flatten it out with the tip of a pen. Do the same for the quills of the crest on the top of the head. Allow the fabric paint to dry.
This is how our mask looked when we finished adding the paint. Carefully peel the painted tulle from the plastic and trim the tulle to the outline of the design.
Place the crystals you want to use in the desired position with the Crystal Katana. We used crystal flatbacks in Capri Blue in sizes SS12, SS16, SS20, SS30 and SS34 on the feathers around the eyes, along with Crystal Volcano in sizes SS9, SS12, SS16 and SS5. In the outline around the eyes, we used flatbacks in White Opal in sizes SS7, SS9, SS12, and SS34. Within the beak, we used flatbacks in Jet Hematite in sizes SS7, SS9 and SS12, along with flatbacks in Jet in sizes SS12, SS16, SS20 and SS30. We filled the area between the eyes with flatbacks in Dark Moss Green in sizes SS7, SS9, SS12 and SS16, along with flatbacks in Fern Green in sizes SS7 and SS12. The crest at the top of the mask is outlined with SS16 Crystal Volcano flatbacks. The center is filled with SS16, SS7 and SS12 Dark Moss Green flatbacks, along with SS7 Fern Green flatbacks. A ring of SS16 Capri Blue flatbacks frame the SS34 Capri Blue flatback at the center of the crest. The quills coming out of the crest are decorated with SS20 Jet flatbacks.
Mix up a batch of 1-hour two-part epoxy. Working on one section of crystals at a time, move the crystals and apply the epoxy with a toothpick. Then, place the crystals back in position. The epoxy won't dry right away, so you will have time to go back and move crystals around if necessary. Allow to dry.
Use the 2-inch gunmetal-plated 20 gauge eye pin to reinforce the beak. Create a simple loop on the straight end of the eye pin and place it down the center of the beak on the back side of the mask. Secure the eye pin in place with Gem-Tac. Cover the top of the eye pin with a tiny bit of cotton, so it will be more comfortable on the nose.
Cut four 24 inch strips of tulle for the ties. Use Gem-Tac to adhere two to each side of the back of the mask. You can use ribbon if you wish. We chose tulle because it does not show in the sheer design of the mask.
Add a second tulle backing to your mask. Apply Gem-Tac around all of the outside edges and the eyeholes and place the second sheet of tulle. This will sandwich the ties and eye pin between the two layers and will also prevent the adhesive from coming in direct contact with the skin. Allow to dry. If possible, allow the adhesive to air out for a few days before wearing. The paint and adhesive used can sometimes have a strong odor.
Trim away all of the excess tulle around the edges and the eye openings. Put on your mask and strut the night away!
Note: Please make sure to double check our list of components with what's actually in stock on the supplies tab. Some of these items are substitutes for discontinued crystals in the original design. We've also added alternate supply codes to try if the original ones are not in stock. PRESTIGE 2088 SS12 Rose Flatback Majestic Blue (2088-MAJB12, qty 6) (Or, try 2088-SAP12) PRESTIGE 2088 SS16 Rose Flatback Capri Blue (2088-BLU16, qty 15) (Or, try 2088-MAJB16) PRESTIGE 2088 SS20 Rose Flatback Capri Blue (2088-BLU20, qty 6) (Or, try 2088-MAJB20) PRESTIGE 2088 SS30 Rose Flatback Majestic Blue (2088-MAJB30, qty 6) (Or, try 2088-COBS30) PRESTIGE 2088 SS34 Rose Flatback Majestic Blue (2088-MAJB34, qty 23) (Or, try 2088-SAP34) PRESTIGE 2058 SS9 Rose Enhanced Flatback Crystal Volcano (2058-CVO9, qty 84) (Or, try 2058-CRD9) PRESTIGE 2088 SS12 Rose Flatback Crystal Volcano (2088-CVO12, qty 8) (Or, try 2088-CPS12) PRESTIGE 2088 SS16 Rose Flatback Crystal Volcano (2088-CVO16, qty 37) (Or, try 2088-CPS16) PRESTIGE 2058 SS5 Rose Enhanced Flatback Crystal Volcano (2058-VOLC5, qty 24) (Or, try 2058-CRD5) PRESTIGE 2058 SS7 Rose Enhanced Flatback Crystal Paradise Shine (2058-CPS7, qty 52) (Or, try 2058-FGN7) PRESTIGE 2088 SS12 Rose Flatback Fern Green (2088-FGN12, qty 24) (Or, try 2088-PER12) PRESTIGE 2058 SS7 Rose Enhanced Flatback White Opal (2058-WOP7, qty 10) (Or, try 2058-CML7) PRESTIGE 2058 SS9 Rose Enhanced Flatback White Opal (2058-WOP9, qty 4) (Or, try 2058-CRY9) PRESTIGE 2088 SS12 Rose Flatback White Opal (2088-WOP12, qty 102) (Or, try 2088-CEW12) PRESTIGE 2088 SS34 Rose Flatback White Opal (2088-WOP34, qty 2) (Or, try 2088-CML34) PRESTIGE 2058 SS9 Rose Enhanced Flatback Dark Moss Green (2058-DMG9, qty 2) (Or, 2058-FGN9) PRESTIGE 2058 SS12 Rose Enhanced Flatback Dark Moss Green (2058-DMG12, qty 37) (Or, try 2088-FGN12) PRESTIGE 2088 SS16 Rose Flatback Fern Green (2088-FGN16, qty 18) (Or, try 2088-PER16) PRESTIGE 2058 SS7 Rose Enhanced Flatback Jet (2058-JET7, qty 17) PRESTIGE 2058 SS9 Rose Enhanced Flatback Jet (2058-JET9, qty 23) (Or, try 2058-HEM9) PRESTIGE 2088 SS12 Rose Enhanced Flatback Jet (2088-JET12, qty 15) (Or, try 2088-HEM12) PRESTIGE 2088 SS16 Rose Flatback Jet (2088-JET16, qty 2) (Or, try 2088-HEM16) PRESTIGE 2088 SS20 Rose Flatback Jet (2088-JET20, qty 10) (Or, try 2088-HEM20) PRESTIGE 2088 SS30 Rose Flatback Jet (2088-JET30, qty 1) (Or, try 2088-HEM30) 2-inch Gunmetal-Plated 20 Gauge Eye Pin (BGM-EP20-22, qty 1) Crystal Katana Rhinestone-Crystal Pick Up Tool (TOOL-0070, qty 1) Gem-Tac Permanent Adhesive 2 fl oz. (GEMTAC02, qty 1)
1-Hour Two-Part Epoxy Adhesive (not sold at Artbeads) Tulle fabric (not sold at Artbeads) Dimensional Fabric Paint (not sold at Artbeads)
Add all available items to your cart at once or edit the quantities below.
Any items with quantities lower than stated minimums will default to the minimum in your cart.
Nice choice! All or most of the products needed for this project are shown
below with quantities. Sometimes we sell out of components and aren’t able to order more from
the manufacturer (we know, it is very disappointing to us, too). Use the opportunity to mix up
the design and make it yours by substituting similar products or altering the entire color
scheme—it’s up to you!
Please wait while we add the products to your cart.
Zeus PRESTIGE Rhinestone Mask
PRESTIGE Crystal Flatback Rhinestone Peacock Mask
designed byCheri Carlson
Skill LevelBeginner
TechniqueCrystal Rhinestones
Time4-6 Hours
Approximate Size9 Inches Wide
What a beautiful mask for a costume ball! And you can tell everyone you made it yourself.
Peacocks were sacred animals to Ancient Greek gods, especially Zeus and Hera. This masquerade mask perfectly showcases why. The sparkling colors mimic the enchanting play of colors in peacock feathers that have mesmerized gods and people for ages. Wear this mask to a costume ball or Halloween party.
Supplies
Crystal Katana Rhinestone-Crystal Pick Up Tool
Code TOOL-0070
$31.19
$38.99
×1
PRESTIGE 2088 SS12 Rose Flatback Fern Green - Min Qty 15
Code 2088-FGN12
$0.14
$0.18
×24
PRESTIGE 2088 SS12 Rose Enhanced Flatback Jet - Min Qty 15
Code 2088-JET12
$0.14
$0.18
×15
PRESTIGE 2088 SS16 Rose Flatback Jet - Min Qty 10
Code 2088-JET16
$0.17
$0.22
×2
PRESTIGE 2088 SS20 Rose Flatback Jet - Min Qty 10
Code 2088-JET20
$0.22
$0.28
×10
PRESTIGE 2058 SS5 Rose Enhanced Flatback Crystal Volcano - Min Qty 15
Code 2058-VOLC5
$0.13
$0.18
×24
PRESTIGE 2088 SS16 Rose Flatback Crystal Volcano - Min Qty 10
Code 2088-CVO16
$0.18
$0.25
×37
PRESTIGE 2088 SS12 Rose Flatback Crystal Volcano - Min Qty 10
Code 2088-CVO12
$0.17
$0.21
×8
PRESTIGE 2058 SS9 Rose Enhanced Flatback White Opal - Min Qty 15
Code 2058-WOP9
$0.11
$0.16
×4
PRESTIGE 2088 SS34 Rose Flatback White Opal - Min Qty 4
Code 2088-WOP34
$0.57
$0.72
×2
Clearance - Was $0.16 - PRESTIGE 2058 SS7 Rose Enhanced Flatback Jet - Min Qty 15
Code 2058-JET7
$0.07
$0.16
×17
Clearance - Was $0.16 - PRESTIGE 2058 SS7 Rose Enhanced Flatback White Opal - Min Qty 15
Code 2058-WOP7
$0.07
$0.16
×10
PRESTIGE 2088 SS12 Rose Flatback White Opal - Min Qty 15
Code 2088-WOP12
$0.13
$0.18
×102
Clearance - Was $0.18 - PRESTIGE 2058 SS12 Rose Enhanced Flatback Dark Moss Green - Min Qty 15
Code 2058-DMG12
$0.08
$0.18
×37
PRESTIGE 2088 SS30 Rose Flatback Jet - Min Qty 4
Code 2088-JET30
$0.43
$0.54
×1
PRESTIGE 2088 SS20 Rose Flatback Capri Blue
Code 2088-BLU20
$0.22
$0.28
×6
PRESTIGE 2088 SS34 Rose Flatback Majestic Blue - Min Qty 4
Code 2088-MAJB34
$0.58
$0.72
×23
PRESTIGE 2088 SS12 Rose Flatback Majestic Blue - Min Qty 15
Code 2088-MAJB12
$0.14
$0.18
×6
Step-by-Step Instructions
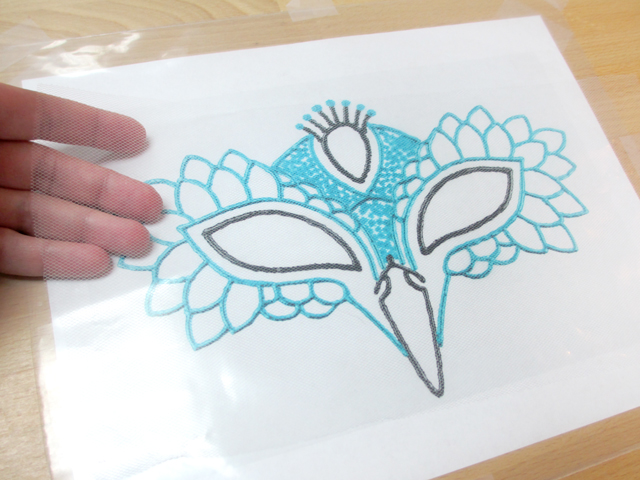
Note: You will need tulle and dimensional fabric paint to complete this project. Print out our PDF of the mask design in order to trace over it with dimensional fabric paint. Tape the template down to the work surface with a plastic sheet taped over it. Tape a piece of sheer tulle over the design.
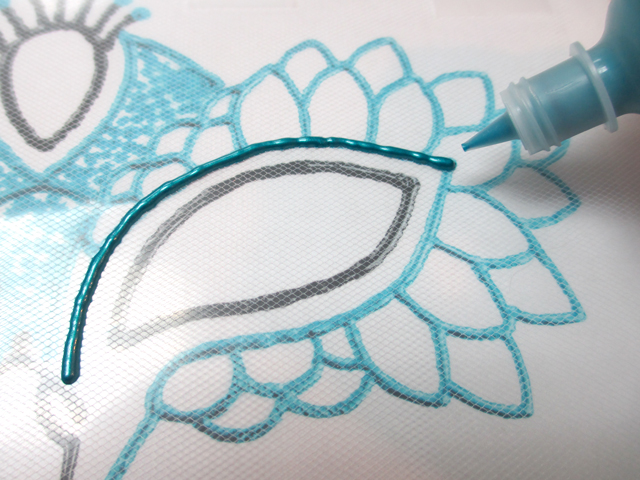
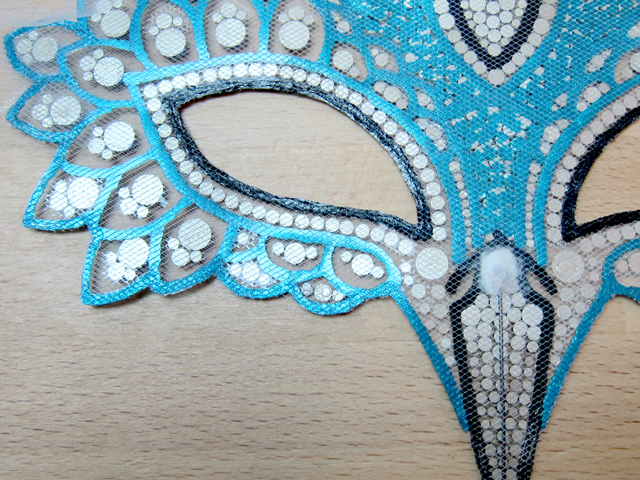
Use dimensional fabric paint to trace the design onto the tulle. We outlined the eyes, beak and crest in black. The rest of the design was traced in teal. For the area between the eyes, dab the paint on and flatten it out with the tip of a pen. Do the same for the quills of the crest on the top of the head. Allow the fabric paint to dry.
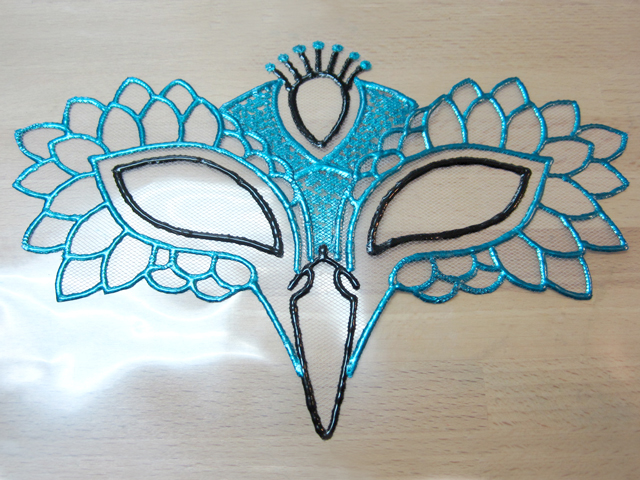
This is how our mask looked when we finished adding the paint. Carefully peel the painted tulle from the plastic and trim the tulle to the outline of the design.
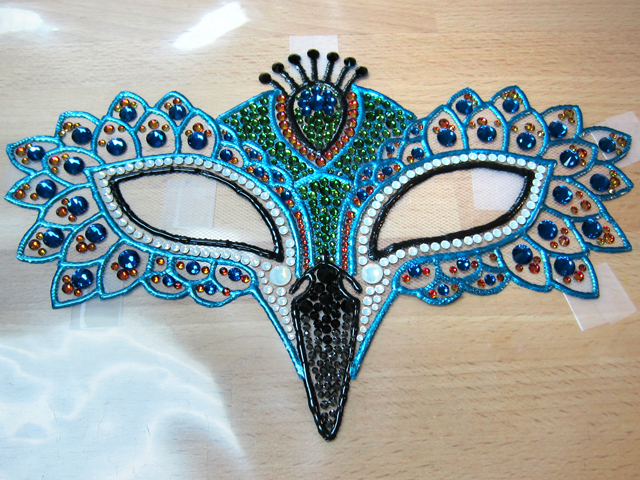
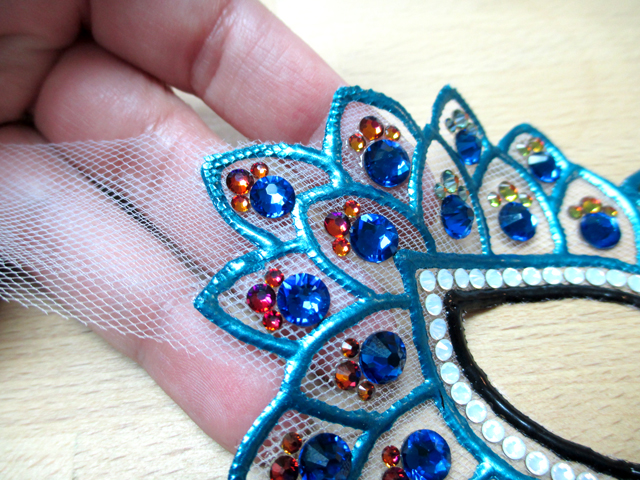
Place the crystals you want to use in the desired position with the Crystal Katana. We used crystal flatbacks in Capri Blue in sizes SS12, SS16, SS20, SS30 and SS34 on the feathers around the eyes, along with Crystal Volcano in sizes SS9, SS12, SS16 and SS5. In the outline around the eyes, we used flatbacks in White Opal in sizes SS7, SS9, SS12, and SS34. Within the beak, we used flatbacks in Jet Hematite in sizes SS7, SS9 and SS12, along with flatbacks in Jet in sizes SS12, SS16, SS20 and SS30. We filled the area between the eyes with flatbacks in Dark Moss Green in sizes SS7, SS9, SS12 and SS16, along with flatbacks in Fern Green in sizes SS7 and SS12. The crest at the top of the mask is outlined with SS16 Crystal Volcano flatbacks. The center is filled with SS16, SS7 and SS12 Dark Moss Green flatbacks, along with SS7 Fern Green flatbacks. A ring of SS16 Capri Blue flatbacks frame the SS34 Capri Blue flatback at the center of the crest. The quills coming out of the crest are decorated with SS20 Jet flatbacks.
Mix up a batch of 1-hour two-part epoxy. Working on one section of crystals at a time, move the crystals and apply the epoxy with a toothpick. Then, place the crystals back in position. The epoxy won't dry right away, so you will have time to go back and move crystals around if necessary. Allow to dry.
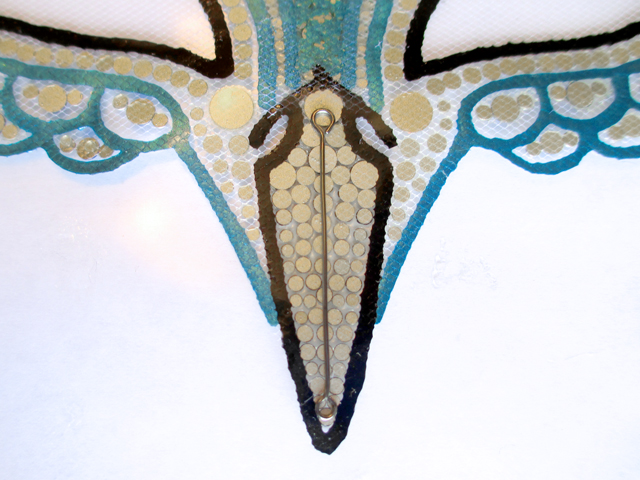
Use the 2-inch gunmetal-plated 20 gauge eye pin to reinforce the beak. Create a simple loop on the straight end of the eye pin and place it down the center of the beak on the back side of the mask. Secure the eye pin in place with Gem-Tac. Cover the top of the eye pin with a tiny bit of cotton, so it will be more comfortable on the nose.
Cut four 24 inch strips of tulle for the ties. Use Gem-Tac to adhere two to each side of the back of the mask. You can use ribbon if you wish. We chose tulle because it does not show in the sheer design of the mask.
Add a second tulle backing to your mask. Apply Gem-Tac around all of the outside edges and the eyeholes and place the second sheet of tulle. This will sandwich the ties and eye pin between the two layers and will also prevent the adhesive from coming in direct contact with the skin. Allow to dry. If possible, allow the adhesive to air out for a few days before wearing. The paint and adhesive used can sometimes have a strong odor.
Trim away all of the excess tulle around the edges and the eye openings. Put on your mask and strut the night away!
Note: Please make sure to double check our list of components with what's actually in stock on the supplies tab. Some of these items are substitutes for discontinued crystals in the original design. We've also added alternate supply codes to try if the original ones are not in stock. PRESTIGE 2088 SS12 Rose Flatback Majestic Blue (2088-MAJB12, qty 6) (Or, try 2088-SAP12) PRESTIGE 2088 SS16 Rose Flatback Capri Blue (2088-BLU16, qty 15) (Or, try 2088-MAJB16) PRESTIGE 2088 SS20 Rose Flatback Capri Blue (2088-BLU20, qty 6) (Or, try 2088-MAJB20) PRESTIGE 2088 SS30 Rose Flatback Majestic Blue (2088-MAJB30, qty 6) (Or, try 2088-COBS30) PRESTIGE 2088 SS34 Rose Flatback Majestic Blue (2088-MAJB34, qty 23) (Or, try 2088-SAP34) PRESTIGE 2058 SS9 Rose Enhanced Flatback Crystal Volcano (2058-CVO9, qty 84) (Or, try 2058-CRD9) PRESTIGE 2088 SS12 Rose Flatback Crystal Volcano (2088-CVO12, qty 8) (Or, try 2088-CPS12) PRESTIGE 2088 SS16 Rose Flatback Crystal Volcano (2088-CVO16, qty 37) (Or, try 2088-CPS16) PRESTIGE 2058 SS5 Rose Enhanced Flatback Crystal Volcano (2058-VOLC5, qty 24) (Or, try 2058-CRD5) PRESTIGE 2058 SS7 Rose Enhanced Flatback Crystal Paradise Shine (2058-CPS7, qty 52) (Or, try 2058-FGN7) PRESTIGE 2088 SS12 Rose Flatback Fern Green (2088-FGN12, qty 24) (Or, try 2088-PER12) PRESTIGE 2058 SS7 Rose Enhanced Flatback White Opal (2058-WOP7, qty 10) (Or, try 2058-CML7) PRESTIGE 2058 SS9 Rose Enhanced Flatback White Opal (2058-WOP9, qty 4) (Or, try 2058-CRY9) PRESTIGE 2088 SS12 Rose Flatback White Opal (2088-WOP12, qty 102) (Or, try 2088-CEW12) PRESTIGE 2088 SS34 Rose Flatback White Opal (2088-WOP34, qty 2) (Or, try 2088-CML34) PRESTIGE 2058 SS9 Rose Enhanced Flatback Dark Moss Green (2058-DMG9, qty 2) (Or, 2058-FGN9) PRESTIGE 2058 SS12 Rose Enhanced Flatback Dark Moss Green (2058-DMG12, qty 37) (Or, try 2088-FGN12) PRESTIGE 2088 SS16 Rose Flatback Fern Green (2088-FGN16, qty 18) (Or, try 2088-PER16) PRESTIGE 2058 SS7 Rose Enhanced Flatback Jet (2058-JET7, qty 17) PRESTIGE 2058 SS9 Rose Enhanced Flatback Jet (2058-JET9, qty 23) (Or, try 2058-HEM9) PRESTIGE 2088 SS12 Rose Enhanced Flatback Jet (2088-JET12, qty 15) (Or, try 2088-HEM12) PRESTIGE 2088 SS16 Rose Flatback Jet (2088-JET16, qty 2) (Or, try 2088-HEM16) PRESTIGE 2088 SS20 Rose Flatback Jet (2088-JET20, qty 10) (Or, try 2088-HEM20) PRESTIGE 2088 SS30 Rose Flatback Jet (2088-JET30, qty 1) (Or, try 2088-HEM30) 2-inch Gunmetal-Plated 20 Gauge Eye Pin (BGM-EP20-22, qty 1) Crystal Katana Rhinestone-Crystal Pick Up Tool (TOOL-0070, qty 1) Gem-Tac Permanent Adhesive 2 fl oz. (GEMTAC02, qty 1)
1-Hour Two-Part Epoxy Adhesive (not sold at Artbeads) Tulle fabric (not sold at Artbeads) Dimensional Fabric Paint (not sold at Artbeads)